
User Guide

Chapter 1 Installation and Initial Power-Up
Page 10
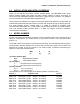
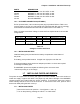
PART # DESCRIPTION
152117 MSP/MPP II 110 VAC IN / 9VDC 1A Out
152220 MSP/MPP II 220 VAC IN / 9VDC 1A Out
153117 MSP/MPP III 110 VAC IN / 9VDC 2A Out
153220 MSP/MPP III 220 VAC IN / 9VDC 2A Out
151129 DC CAR ADAPTER
1.6.2 DC POWER CONNECTION (OPTIONAL)
For DC powered units, a two conductor power plug is provided. Refer to Table 1.0 to
connect power to your DC unit. No internal fuse is provided with DC units. It is strongly
recommended to install external fuses with the values shown in the table 1.0.
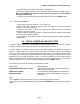
Table 1.0 below summarizes Voltage, Current and Fuse requirements for AC and DC
configurations.
MODEL # VOLTAGE +/- CURRENT FUSE
MSP/MPP 110VAC 10% .1A INTERNALLY FUSED
MSP/MPP 220VAC 10% .06A INTERNALLY FUSED
MSP/MPP 7.5-
13.6VDC
-- 4 WATTS 1.0A SLB
Table 1.0
Voltages, Currents and Fuses
1.6.3 INSTALLING BATTERY
Install the battery pack provided into the battery compartment at the bottom of
the printer.
The battery pack provided must be charged over night prior to its first use.
To charge the battery pack use the AC adaptor provided. 8-10 hours are required
to recharge the battery pack.
The MSP/MPP printers are capable of delivering from one to two hours
continuous printing on a full charge.
1.7 INSTALLING PAPER AND RIBBON
The printer is shipped from the factory with paper and ribbon installed, refer to this section to
install new supply of paper and ribbon. The paper tray and ribbon cartridge of the MSP/MPP
compact printers are located inside the printer enclosure. To access the paper tray and the
ribbon cartridge the back cover must be removed. To remove the back cover, press in at the
arrow mark while pulling the back cover up.
1.7.1 INSTALLING PAPER
Remove the back cover (section 1.7 and figures 1.1 and 1.3).
Turn on the printer by pressing the <SLCT> or <ON> switch.