
Operation Manual


V1.1 3/04
3
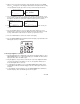
4. When you have your first desired power-on time and date entered, press the PROG
button. 1
OFF
now appears on the display to indicate that the first power-off time is ready
to be programmed. Repeat steps 2 and 3 to enter your first desired power-off time.
5. Press the PROG button again. 2
ON
appears on the display to indicate that the second
power-on time is ready to be programmed. Repeat the same procedure used in steps 2
through 4 to enter the rest of your power-on/power-off times (up to 6 on/off times
maximum).
6. Press the PROG button to step through the times you entered to make sure they are
correct.
7. Press the RST/RCL button to reset or recall any timer entries. When you reset a
particular power-on/off entry, four dashes will appear instead of time. When you recall
an entry, it will return the values that were set before you performed a reset.
8. Press the CLOCK button to return to the real time clock display.
9. Press the ON/AUTO/OFF button until the bar below the display is positioned above the
OFF legend on the face of the timer.
Connecting an Appliance to the Timer
1. Plug the Digital Timer into a standard AC outlet. If the power indicator light is on, press
ON/AUTO/OFF button once or twice until the light goes out. NOTE: The bar below the
display should be above the “OFF” legend.
2. Plug the appliance cord you wish to control into the socket on the Digital Timer. Make
sure any power switch on the appliance is set to on. (The appliance will not turn on
because the Digital Timer is set to off).
3. To manually turn the appliance on, press the ON/AUTO/OFF button until the power
indicator lights and the bar below the display is above the “ON” legend on the timer’s
faceplate.
4. To automatically control the appliance, press the ON/AUTO/OFF button until the bar
below the display is above the “AUTO” legend on the faceplate.
MoTWTFSS
UEHRAU
_ _ _ _
|OFF
MoTWTFSS
UEHRAU
|OFF
12:00
00
MoTWTFSS
UEHRAU
_ _ _ _
2ON
MoTWTFSS
UEHRAU
_ _ _ _
2OFF
AM
MTWTFSS
OU EHRAU
________