User Guide Heavy Duty Pitot Tube Anemometer and Differential Pressure Manometer Model HD350
Introduction Congratulations on your purchase of the Extech HD350. This handheld meter measures and displays air velocity (speed), air flow (volume), ambient air temperature, and gauge/differential pressure. This meter is shipped fully tested and calibrated and, with proper use, will provide years of reliable service. Features Pitot tube Anemometer measurements for Air Velocity and Air Flow (volume). Manometer (Differential Pressure) Measurements.
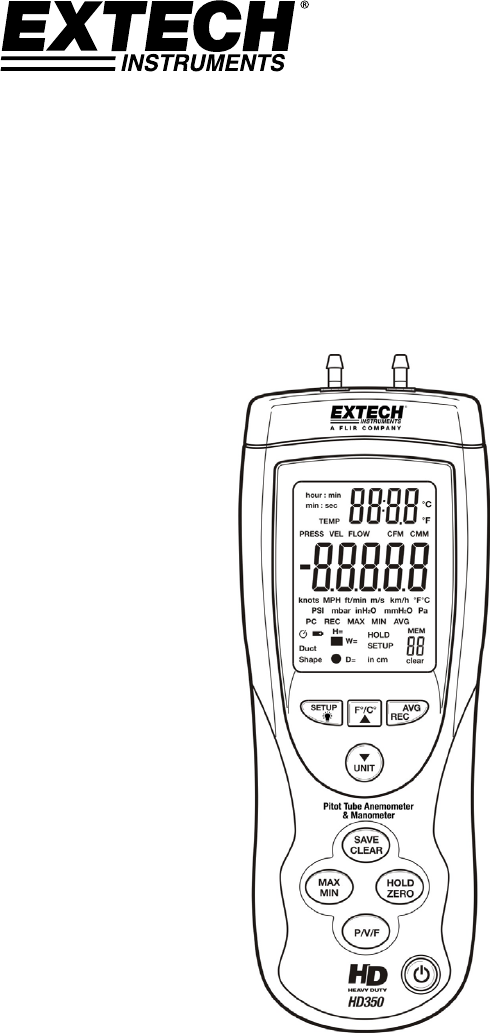
Meter Description 1. Pitot tube. Hold the tube in the flow of air to take a reading 2. Pressure Manometer hose 1 Black 3. Pressure Manometer hose 2- White 4. Pressure Connector (+) 1 5. Pressure Connector (-) 6. Temperature sensor 7. LED display shows readings, units, setup parameters, and user alerts 8. PC interface jack: Use the supplied cable to connect the meter to a PC 9. Upper Keypad: F/C : Press to change the unit of measure for Temperature.
Display Description 1. Elapsed timer display units (min:sec or hour:min) 2. Pressure, Velocity, Flow and Temperature mode indicators 3. Primary Measurement Display 4. Units of measure for air velocity 5. Units of measure for pressure 6. Indication that the meter is communicating with the PC 7. Auto Power Off mode indicator 8. Low battery indicator 9. Duct Shape indicator 10. Data Hold indicator 11. Height/Width (rectangular duct) or Diameter (circular duct) 12. Setup mode indicator 13.
Setup Mode Changing Setup Options The Setup mode is used to select the shape/dimensions of an air duct for Air Flow Measurements, engage/disengage Sleep mode (auto power OFF), hide/view measurement types, and selectively delete (clear) readings from the 99-location internal memory. The meter stores these settings in its internal non-volatile memory.
Air Duct Properties (for Air Flow Measurements) Air Duct - Unit of Measure: 1. Press and hold the SETUP button for two (2) seconds to enter the Setup mode. The SETUP display icon will appear. 2. Use the arrow keys to scroll to the UNIT display. 3. Press the AVG REC button and the display will show ‘in’ (inches) or ‘cm’ (centimeters) at the bottom of the LCD in relatively small digits. 4. Use the arrow keys to change the unit of measure. 5. Press the AVG REC button to save the setting.
2 Air Duct – Area (pi*r ) for Circular Ducts: 18. Continuing from Step 8 above. For circular air ducts, the ‘D=’ icon (duct diameter) will appear. The display will show DECI (decimal) at the top and a 5-digit number directly below. The 5digit number is used to program the duct’s width. 19. Use the arrow keys to move the decimal to the desired position 20. Press the SAVE CLEAR button to move the display cursor to the right-most digit.
Delete (Clear) Stored Readings As described in the dedicated section on the meter’s internal memory feature, the meter can store up to ninety-nine (99) readings for instant recall. The CLEAR feature in the Setup mode allows the user to selectively delete stored readings by type or to delete all of the readings. 1. Press and hold the SETUP button for two (2) seconds to enter the Setup mode. The SETUP display icon will appear. 2. Use the arrow keys to scroll to the ‘ALL’ display. 3.
Measurements Pressure Measurements 1. Turn the meter ON using the power button 2. Use the P/V/F button to scroll to the Pressure Measurement Mode (the ‘PRESS’ display icon will appear). 3. The Primary display shows gauge or differential Pressure measurements (in the range of ±5000Pa) in the following units of measure (selectable): PSI, mbar, Pa, inH2O, and mmH2O. To change the displayed unit of measure for Pressure, use the UNIT ▼button. 4.
Air Flow (Volume) Measurements 1. Press the P/V/F button to enter the Air Flow (Volume) mode (FLOW will appear on the LCD). The Primary display area will show the Air Flow measurement. 2. Use the UNIT ▼button to select the desired unit of measure (CMM or CFM). 3. To view the currently programmed duct area and shape: Press the P/V/F button three more times to access the duct size/dimensions display.
MIN, MAX, and AVG Readings 1. Press the MIN-MAX button to start a MIN-MAX-AVG session. The elapsed timer will start (shown on the top right, secondary LCD display area) and indicate the minutes and seconds that have elapsed since the session started. 2. Use the P/V/F button to select the measurement type to review (Pressure, Air Velocity, or Air Flow). 3.
Battery Replacement When the low battery indicator appears on the display (or if the meter does not switch on when the power button is pressed), please replace the battery. To replace the battery: 1. Open the battery compartment by sliding the meter’s rear panel in the direction of the embossed arrow. 2. Replace the 9V alkaline battery 3. Replace the battery compartment cover. 4.
Specifications General Specifications Display Measurements Multi-function LCD with Backlighting Air Velocity: m/s, km/h, ft/min, knots, mph; 3 3 Air Flow: CMM (m /min) and CFM (ft /min); Pressure: psi, mbar, inH2O, mmH2O, Pa Air Temperature: °C and °F Data Hold Freezes displayed reading Response Time 0.5 seconds (typ.) Linearity / Hysteresis ±0.29 F.S.
Air Velocity Specifications Air Velocity Range Resolution m/s (meter per second) 1 to 80.00 0.01 ft/min (feet per minute) 200 to 15733 1 km/h (kilometers per hr) 3.5 to 288.0 0.1 MPH (miles per hour) 2.25 to 178.66 0.01 Knots (nautical mph) 2.0 to 154.6 0.1 Accuracy ±(1%FS + 5digits) @ 5.00 to 10.00m/s Air Flow Specifications Air Flow Range CFM (cubic feet per minute) 0 to 99,999ft /min Resolution CMM (cubic meters per minute) 0 to 99,999m /min 3 0.0001 to 100 3 0.
Useful Equations Calculating the Area for rectangular or square ducts Rectangle: Area (A) = Height (b) x Width (a) Circle: Area (A) = x r2 (Where = 3.14 and r2 = radius x radius) a b r Cubic equations 3 2 CFM (ft /min) = Air Velocity (ft/min) x Area (ft ) 3 2 CMM (m /min) = Air Velocity (m/sec) x Area (m ) x 60 NOTE: Measurements made in inches must be converted to feet or meters. Copyright © 2013‐2015 FLIR Systems, Inc.