
Installation guide


244 Extreme Networks Consolidated "e" and "i" Series Hardware Installation Guide
Installing and Connecting BlackDiamond 6800 Series Power Supplies
4 Prepare the power supply as follows:
a Support the power supply with both hands under the unit while you check the connectors for
dust and packing materials.
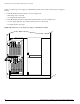
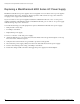
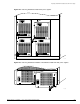
b Note the correct orientation of the power supply as noted in Figure 136 and Figure 137.
c Open the locking handle.
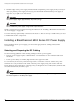
5 Slowly slide the power supply into the power supply bay.
CAUTION
Do not slam the power supply into the backplane. Use the locking handle to secure the power supply
unit into the chassis.
6 Push in on the locking handle until it clicks in place to secure the power supply.
7 Tighten the screws using a #1 Phillips screwdriver.
8 To turn on power to the system, connect the AC power cables to the power supplies and then to the
wall outlet.
Leave the ESD strap permanently connected to the chassis so that it is always available when you need
to handle ESD-sensitive components.
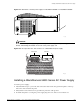
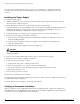
To install additional power supplies, repeat steps 3 through 8.
Figure 139: Installing a second power supply in a BlackDiamond 6808 or a BlackDiamond 6804
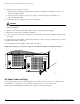
AC Power Cable and Plug
Use the appropriate AC power cable and plug for your switch and your location. See “Wiring Closet
Considerations” on page 30 for more information about the types of power cords to use.
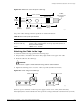
Figure 140 shows the BlackDiamond 6800 series 220 VAC power cable and plug.
AC IN
BD_028
DC OUT
50021
POWER
DC OUT
AC IN
50021
POWER