
Installation Guide
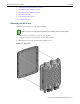
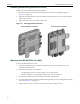
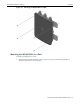
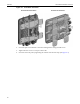
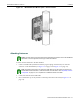
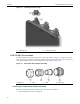

Table Of Contents
- Enterasys Networks, Inc. Firmware License Agreement
- Contents
- About This Guide
- Introduction
- Installation
- Specifications
- Regulatory Information

Installation WS-AP3865e Installation Procedures
2-4
Attaching the Mounting Bracket to the AP
Toattachthemountingbracket totheWS‐AP3865e:
1. Determinethedesiredorientation(verticalorhorizontal)ofthemountingbracket(see
Figure 2‐2onpage 2‐4).
2. AttachthemountingbrackettotheWS‐AP3865eusingfourM4screws,fourspringwashers,
andfourflatwashers.
3. Tightenthefourscrewstoatorque
of12.0in‐lbs.
Figure 2-2 Mounting Bracket Orientation
Mounting the WS-AP3865e to a Wall
ToattachtheWS‐AP3865etoawall:
1. Usingthemountingbracket asaguide,markthelocationforthemountingscrewsona
horizontal,flatwallsurface.
2. Drillfourholesintothewallasfollows:
–forinstallingtheAPonamasonrywall,usea5/16”diameterbit.
–forothermaterials,use
theappropriatedrillforthescrewsbeingused.
3. Formasonryinstallations,placefouranchorassembliesintotheholes.
4. SecuretheWS‐AP3865e(withtheattachedmountingbracket)tothewallusingfourmounting
screws(seeFigure 2‐3onpage 2‐5).
5. Tightenthefourscrewstoatorqueof10.0in‐lbsif
youareusing#10screws.
Horizontal Bracket Orientation Vertical Bracket Orientation