VE6120H Virtual Appliance Installation Guide ExtremeCloud™ Appliance Version 4.76.
Copyright © 2020 Extreme Networks, Inc. All rights reserved. Legal Notice Extreme Networks, Inc. reserves the right to make changes in specifications and other information contained in this document and its website without prior notice. The reader should in all cases consult representatives of Extreme Networks to determine whether any such changes have been made. The hardware, firmware, software or any specifications described or referred to in this document are subject to change without notice.
Table of Contents Preface.......................................................................................................................................................................................iv Conventions....................................................................................................................................................................iv Text Conventions...........................................................................................................
Preface This section describes the text conventions used in this document, where you can find additional information, and how you can provide feedback to us. Conventions This section discusses the conventions used in this guide. Text Conventions Unless otherwise noted, information in this document applies to all supported environments for the products in question. Exceptions, like command keywords associated with a specific software version, are identified in the text.
Preface Text Conventions Table 1: Notes and warnings (continued) Icon Notice type Alerts you to... Caution Risk of personal injury, system damage, or loss of data. Warning Risk of severe personal injury. Table 2: Text Convention Description screen displays This typeface indicates command syntax, or represents information as it appears on the screen. The words enter and type When you see the word enter in this guide, you must type something, and then press the Return or Enter key.
Documentation and Training Preface Documentation and Training Find Extreme Networks product information at the following locations: Current Product Documentation Release Notes Hardware/software compatibility matrices for Campus and Edge products Supported transceivers and cables for Data Center products Other resources, like white papers, data sheets, and case studies Extreme Networks offers product training courses, both online and in person, as well as specialized certifications. For details, visit www.
Subscribe to Service Notifications Preface Before contacting Extreme Networks for technical support, have the following information ready: • Your Extreme Networks service contract number, or serial numbers for all involved Extreme Networks products • • • A description of the failure • • • A description of any actions already taken to resolve the problem A description of your network environment (such as layout, cable type, other relevant environmental information) Network load at the time of trouble
Virtual Appliance Deployment Deployment Requirements on page 8 Connectivity Requirements on page 9 Deploy the VE6120H on a Host Platform on page 9 The virtual appliance can be deployed on the following platforms: • • • Windows server 2016 or later version. Windows server 2016 core with Hyper-V role only. Standalone Hyper-V 2016 or later version. Deployment Requirements The entire virtual appliance is delivered as a .ZIP file, that needs to be installed once.
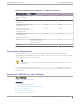
Connectivity Requirements Virtual Appliance Deployment Table 4: Virtual ExtremeCloud Appliances on VE6120H (continued) Extreme application VE6120H Total managed access points per appliance pair 100 500 1000 Total switches managed 50 or 100 per appliance 100 or 200 200 or 400 Total simultaneous users 1000 in standalone mode 4000 8000 Additional simultaneous 1000 users supported in highavailability mode 4000 8000 Total simultaneous users 2000 per appliance pair 8000 16000 Hardware requirem
Download the VE6120H Image Virtual Appliance Deployment Download the VE6120H Image About This Task Download the VE6120H virtual appliance software image to your Hyper-V host. Procedure 1. Access the VE6120H download page at https://extremeportal.force.com. 2. Download the image from Downloads > Downloads Home tab. a. Log into the Downloads Home using your Extreme Portal login credentials. b. Type VE6120H in the search tab and select the search icon. The image list is displayed. c.
Access the Hyper-V Host Virtual Appliance Deployment Procedure 1. Launch Remote Desktop Connection application. The connection screen is displayed. Figure 1: Remote Desktop Application connection screen 2. On the login screen: a. b. c. d. e. f. Type the IP address of the Hyper-V server in the computer field. Select Connect. Select Use Another Account. Select Ok. Enter the username and password of an account that has full admin access. Select Ok.
Access the Hyper-V Host 3. In the Start menu, select Hyper-V Manager. The Hyper-V Manager screen displays. 12 VE6120H Virtual Appliance Installation Guide for version 4.76.
Virtual Appliance Deployment Install the Virtual Appliance Image Install the Virtual Appliance Image Procedure 1. Select the WIN-N5CPFVN4OU6 host from the Hyper-V Manager dialog, under Hyper-V Manager. VE6120H Virtual Appliance Installation Guide for version 4.76.
Install the Virtual Appliance Image 2. Select import virtual machine from Actions. The import virtual machine screen displays. 3. Select Next. The Locate Folder screen is displayed. 14 VE6120H Virtual Appliance Installation Guide for version 4.76.
Virtual Appliance Deployment Install the Virtual Appliance Image 4. Select Browse on the Locate Folder screen, and specify the folder where you have unpacked the VE6120H files. 5. Select Next. VE6120H Virtual Appliance Installation Guide for version 4.76.
Install the Virtual Appliance Image 6. From Select Virtual Machine, select the VE6120H file. 7. Select Next. 16 VE6120H Virtual Appliance Installation Guide for version 4.76.
Virtual Appliance Deployment Install the Virtual Appliance Image 8. On the Choose Import Type screen, select Copy the virtual machine, and select Next. VE6120H Virtual Appliance Installation Guide for version 4.76.
Install the Virtual Appliance Image Virtual Appliance Deployment 9. On the Choose Destination screen, use the default settings for the virtual machine file, and select Next. 18 VE6120H Virtual Appliance Installation Guide for version 4.76.
Virtual Appliance Deployment Install the Virtual Appliance Image 10. On the Choose Storage Folders screen, choose the default folders to store the virtual hard disks, and select Next. VE6120H Virtual Appliance Installation Guide for version 4.76.
Install the Virtual Appliance Image Virtual Appliance Deployment 11. On the Connect Network screen, select a virtual switch type from the drop-down menu, and select Next. Note The configuration error message displayed is expected behavior. Hyper-V Manager will not display this screen when all virtual switches for the image configuration matches one-toone with switches configured on the host. The summary page displays a summary of your selections.
Virtual Appliance Deployment Configure the Network Adapter 12. Review each setting, select Previous to return to previous screens and make any required changes. Select Finish to complete the deployment. 13. Select Finish. The image will be imported. A progress bar reports deployment progress. Configure the Network Adapter About This Task The Hyper-V settings menu is used to map the VE6120H ports to virtual switches configured on the Hyper-V host. Procedure 1. Open the Hyper-V manager. 2.
Configure the Network Adapter Virtual Appliance Deployment 4. Select Settings from the Action menu. 5. From Hardware, select one of the following adapters: • MgmtAdapter MgmtAdapter is the network the VE6120H management port is expecting to connect to. That network should be mapped to a virtual switch that will be used for management traffic. • PhysAdapter1 PhysAdapter1 is the network that the VE6120H Port1 expects to use.
Virtual Appliance Deployment Configure the Network Adapter VE6120H Virtual Appliance Installation Guide for version 4.76.
Configure the Network Adapter Virtual Appliance Deployment 6. Select the Virtual Switch to connect to from the drop-down menu on Virtual switch under Network Adapter. 7. Select Ok. 24 VE6120H Virtual Appliance Installation Guide for version 4.76.
Virtual Appliance Configuration Access the Virtual Appliance Console on page 25 Configure the Virtual Appliance Using the Basic Configuration Wizard on page 27 Set Up the Virtual Appliance Using the Basic Configuration Wizard on page 28 Upgrade the Virtual Appliance Software on page 31 Activate the ExtremeCloud Appliance on page 33 After the VE6120H ExtremeCloud Appliance has been deployed on a MS Hyper-V server using the instructions in Virtual Appliance Deployment, you are ready to perform initial server
Access the Virtual Appliance Console Virtual Appliance Configuration 2. Select Action > Start to start the Virtual Machine. 3. Select Action > Connect to open the Virtual Machine command line interface (CLI). The console will prompt for credentials. 26 VE6120H Virtual Appliance Installation Guide for version 4.76.
Configure the Virtual Appliance Using the Basic Configuration Wizard Virtual Appliance Configuration Note Double-click inside the console window to make the window interactive. If the prompt is not visible, press the Enter key. 4. Enter the following credentials: For username, enter admin. For password, enter abc123. You are now working in the virtual appliance CLI.
Set Up the Virtual Appliance Using the Basic Configuration Wizard Virtual Appliance Configuration The configuration wizard prompts with a set of Yes or No questions. The default value is indicated in parenthesis. To accept the default value, select Enter. For more information about using the Basic Configuration Wizard, see Set Up the Virtual Appliance using the Basic Configuration Wizard.
Virtual Appliance Configuration Current Host Attributes Settings 2. Set IP address to 10.0.0.1. 3. Press Enter. 4. Set the Netmask value to 255.255.255.0. 5. Press Enter. 6. Press Enter again to set the default VLAN. The tagged frames command is displayed. 7. Press Enter to keep the default tagged frames value to No. 8. To enable management on the interface, press Enter to select the default value, Yes. 9. Press Enter to enable device registration, and select the default value yes.
Current Time Settings Virtual Appliance Configuration Procedure 1. Type an IP address. 2. Press Enter to accept the changes. You are navigated to the Current Time Settings CLI. Current Time Settings About This Task The current time settings option allows you to change the timezone as per your location. Procedure 1. Press Enter to change the time settings. 2. Press Enter again to change the timezone. The region number list is displayed.
Virtual Appliance Configuration Upgrade the Virtual Appliance Software 10. Press Enter to accept the settings. The default option for accepting the settings is A. Your settings are now applied successfully. Upgrade the Virtual Appliance Software About This Task If you are not installing the latest ExtremeCloud Appliance release, you need to upgrade the software to the latest patch release. Procedure 1.
Virtual Appliance Configuration Perform a Backup Destination of the uploaded image file: • • Local Flash (The Flash drive must be mounted.) Upload Method Method used to upload image file to appliance. Valid values are: • • • HTTP — Indicates to upload from a local workstation. FTP — Indicates to upload from the corresponding server. SCP — Indicates to upload from the corresponding server. When the Upload Method is FTP or SCP, configure the server properties.
Virtual Appliance Configuration • Activate the ExtremeCloud Appliance SCP — Indicates to upload from the corresponding server. When the Upload Method is FTP or SCP, configure the server properties. Copy Image from Local Drive When the Upload Method is HTTP, drag image onto EExtremeCloud Appliance or select field to navigate to local file directory.
Configure Virtual Switches for the Virtual Appliance Create a New Virtual Switch on the Host Server on page 34 Disable Receive Segment Coalescing (RSC) on a Virtual Switch (Windows Server 2019) on page 37 Clone a Deployed Virtual Appliance on page 37 The Virtual Appliance has some specific requirements on the virtual switches to which its data plane ports (PhysAdapter1 and PhysAdapter2) are connected. This chapter explains how to create a virtual switch on a Hyper-V host that satisfies these requirements.
Configure Virtual Switches for the Virtual Appliance Create a New Virtual Switch on the Host Server 2. Select Virtual Switch Manager on Hyper-V Manager > Actions. 3. Create a virtual switch for each data plane interface as follows: a. Select New virtual network switch from Virtual Switches. b. Select External type of virtual switch from Create virtual switch. c. Select Create Virtual Switch. VE6120H Virtual Appliance Installation Guide for version 4.76.
Create a New Virtual Switch on the Host Server Configure Virtual Switches for the Virtual Appliance 4. Select External network, and select Allow management operating system to share this networks adapter from Connection type to change VLAN ID for management operating system. Note The Allow management selection is required only if the external physical network card is going to be shared between the Hyper-V host (host management) and the virtual machine.
Configure Virtual Switches for the Virtual Appliance Disable Receive Segment Coalescing (RSC) on a Virtual Switch (Windows Server 2019) Disable Receive Segment Coalescing (RSC) on a Virtual Switch (Windows Server 2019) About This Task Windows Server 2019 Hyper-V has a new feature on a Virtual Switch called Receive Segment Coalescing (RSC), which is enabled by default. This feature results in Hyper-V server freeze when there is excessive traffic.
Shut Down and Restart a Virtual Machine Shut Down and Restart a Virtual Machine Using the Graphical User Interface (GUI) on page 38 Shut Down a Virtual Machine on a Hyper-V Server on page 39 About This Task You need to shut down a virtual machine before configuring it to gain more networking performance. For information on how to access the Basic Configuration Wizard, see Access the Virtual Appliance Console on page 25.
Shut Down a Virtual Machine on a Hyper-V Server Shut Down and Restart a Virtual Machine Shut Down a Virtual Machine on a Hyper-V Server Procedure Right-click the virtual machine you need to shut down, and select Shut Down. The virtual machine shuts down. VE6120H Virtual Appliance Installation Guide for version 4.76.
Index A S access the virtual appliance console 25 set up data port settings 28 gateway settings 28 host attributes 28 time settings 28 virtual appliance 28 software upgrade 31 support, see technical support B backup backup config 32 backup schedule 32 perform a backup 32 store backup file 32 basic configuration wizard 27 C configure the virtual appliance 27 configure virtual switches 34 conventions notice icons iv text iv copy backup 32 create virtual switch 34 D disable receive segment coalescing 37