Scheduler for Extreme Campus Controller User Guide Version 1.2.
Copyright © 2021 Extreme Networks, Inc. All rights reserved. Legal Notice Extreme Networks, Inc. reserves the right to make changes in specifications and other information contained in this document and its website without prior notice. The reader should in all cases consult representatives of Extreme Networks to determine whether any such changes have been made. The hardware, firmware, software or any specifications described or referred to in this document are subject to change without notice.
Table of Contents Preface...................................................................................................................................4 Text Conventions.......................................................................................................................................................... 4 Documentation and Training.................................................................................................................................. 5 Getting Help..........
Preface Read the following topics to learn about: • • • The meanings of text formats used in this document. Where you can find additional information and help. How to reach us with questions and comments. Text Conventions Unless otherwise noted, information in this document applies to all supported environments for the products in question. Exceptions, like command keywords associated with a specific software version, are identified in the text.
Documentation and Training Preface Table 2: Text Convention Description screen displays This typeface indicates command syntax, or represents information as it is displayed on the screen. The words enter and type When you see the word enter in this guide, you must type something, and then press the Return or Enter key. Do not press the Return or Enter key when an instruction simply says type. Key names Key names are written in boldface, for example Ctrl or Esc.
Preface Getting Help Getting Help If you require assistance, contact Extreme Networks using one of the following methods: Extreme Portal Search the GTAC (Global Technical Assistance Center) knowledge base; manage support cases and service contracts; download software; and obtain product licensing, training, and certifications. The Hub A forum for Extreme Networks customers to connect with one another, answer questions, and share ideas and feedback.
Preface Providing Feedback • • Improvements that would help you find relevant information in the document. Broken links or usability issues. If you would like to provide feedback, you can do so in three ways: • • • In a web browser, select the feedback icon and complete the online feedback form. Access the feedback form at https://www.extremenetworks.com/documentation-feedback/. Email us at documentation@extremenetworks.com.
Welcome to Scheduler for Extreme Campus Controller Install Scheduler for Extreme Campus Controller on page 8 Generate API Key on page 9 Upload API Key File on page 10 Access Scheduler for Extreme Campus Controller on page 10 Scheduler for Extreme Campus Controller enables customers to define a schedule for network service per network name or SSID.
Welcome to Scheduler for Extreme Campus Controller 5. 6. 7. 8. Generate API Key To install directly from the Docker hub, select Registry, then OK. Or, To install a local file, select File > Upload. Navigate to the Docker file and select Open. Select OK. The application is uploaded and installed on Extreme Campus Controller. 9. Generate an API key on Extreme Campus Controller and associate it with the application before running the application.
Welcome to Scheduler for Extreme Campus Controller Upload API Key File 5. To download the API key as a .json file, select Download. Download the key immediately. If you select Close, you will not be able to access the key. You can generate additional keys at any time. 6. After you download the key, select Close.
Welcome to Scheduler for Extreme Campus Controller • Access Scheduler for Extreme Campus Controller From a browser window, use the HTTPS protocol on the TCP port 5825. 1. If your Extreme Campus Controller has the IP address 192.168.10.10, you can manage in a browser by typing https://192.168.10.10:5825/apps/extreme-scheduler into the URL field. 2. Log in using your Extreme Campus Controller credentials. • From Extreme Campus Controller Applications page. 1. Go to Administration > Applications. 2.
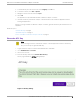
Dashboard The Dashboard consists of four panels that provide an overview of the application. Last Successful Execution A summary of the last successfully executed event. Actions: • • — Select to view the configured execution parameters. — Select to navigate to the Execution Logs. In the new view, the event briefly flashes making it easy to identify. Last Failed Execution A summary of the last failed event.
Dashboard Figure 2: Overview Dashboard Scheduler for Extreme Campus Controller User Guide for version 1.2.
Scheduler Work with Schedule View on page 15 Add Scheduled Events on page 17 Edit Scheduled Events on page 19 Delete Scheduled Events on page 19 Use the Scheduler calendar to manage events. Select Scheduler to display a calendar view of events with the following features: • • Display a weekly or a monthly calendar of events. Date Controls: ◦ Select a specific date ◦ Display today's events ◦ Navigate the calendar by week or month. • • 14 Add, edit, and delete events.
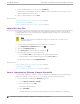
Work with Schedule View Scheduler Figure 3: Event Schedule Related Topics Work with Schedule View on page 15 Add Scheduled Events on page 17 Work with Schedule View The event Scheduler calendar uses a 24-hour format. Scheduler for Extreme Campus Controller User Guide for version 1.2.
Work with Schedule View Scheduler Figure 4: Scheduler Calendar View The following options on the event Scheduler control the calendar view: 1. Specify a time zone from the drop-down field at the top of the calendar. 2. Use the arrows to display the previous and next week or month, depending on which setting: Week or Month is selected. 3. Select Change Date to display a calendar and select a date. 4. Select Today to display the month or week that includes the current day.
Add Scheduled Events Scheduler Add Scheduled Events To add an event: 1. Go to Scheduler and select . Alternatively, select a time period on the calendar: • • Scheduler application opens the Add Event dialog. • • Network Start. This enables the selected SSIDs. Scheduler application uses the selected Start and End time when configuring recurrence. You can modify the values if necessary. 2. Provide the event name and select Next. 3. Select the event type. Valid values are: Aggregated Report.
Add Scheduled Events Scheduler Configure the first day and last day of the event. The Every field indicates how often the event occurs. For example, if set to 2, the event occurs once every 2 days. • Weekly Configure the Start and End date and time for the event. Select time in 24-hour format. to select the date. Provide the Configure the first day and last day of the event. Select to select the date. The Every field indicates how often the event occurs.
Edit Scheduled Events Scheduler Related Topics Edit Scheduled Events on page 19 Delete Scheduled Events on page 19 Edit Scheduled Events To modify an event on the Schedule calendar: 1. Go to Scheduler and select the event on the calendar. Or, go to the Event List and select Actions field. in the The Edit Event dialog displays. 2. Modify the event settings. Select Next or Previous to navigate through the configuration wizard. 3. Select Save.
Event List Go to Event List to view a list of configured events. Figure 6: Event List screen • • • • Select the value in the Recurrence column to view the event recurrence details. Select to view the calendar schedule that includes the event. In the new view, the event briefly flashes making it easy to identify. Select to edit event details or delete the event. Select Refresh to manually refresh the Event List.
Logs The Logs screen provides information about executed events and their outcome. Figure 7: Logs screen The following information is provided for each event on the Logs screen: Status Event status. Valid values are: • • • Green — Successfully running. Yellow — Trouble in execution. Configuration necessary. Red — Failed. Not running. Event Name of the event. Events are limited to enabling and disabling a network SSID. Provide a descriptive event name. You can sort alphabetically by Event Name.
Logs • Network Stop Stage Indicates if the event has been started or stopped. You can sort by Stage value. Valid values are: • • Begin End Scheduled At Date and time the event was scheduled to run. Started At Date and time the event actually ran. Note Factors such as system status or system load can impact the Start and Duration of an event. Details for specific events are provided on the Dashboard and Logs page. Duration Duration of the event. Actions Actions you can take on an event.
Services Configure Services on page 23 Go to Services to view a list of services deployed to Scheduler application. Figure 8: Services screen The current status of each service is displayed: • • • Green — Successfully running. Yellow — Trouble in execution. Configuration necessary. Red — Failed. Not running. If the service allows configuration, service. is displayed in the Actions column. Select to configure the Note Not all services allow user configuration.
Configure Services Services If the service allows configuration, service. is displayed in the Actions column. Select to configure the Note Not all services allow user configuration. The following parameters are used to access the server where the service is running: User User ID Password Password Server Server address Related Topics Services on page 23 24 Scheduler for Extreme Campus Controller User Guide for version 1.2.