A3 Quick Start Guide This document is the Quick Start Guide for the A3 system version 4.0.0 or higher. It includes setup and installation instructions as well as multiple demonstrations of A3 authentication. This version of the Quick Start Guide utilizes an environment in which Registration and Isolation VLANs are NOT used. The distinction between environments that use and don’t use VLANs is discussed in the following chapter. A companion guide is available which discusses the VLANbased environment.
A3 Quick Start Guide Part Number: 9036855-02 Rev AA A3 Quick Start Guide Community 2
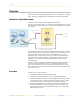
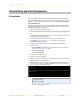
Overview Overview This A3 Quick Start Guide will guide you through the process of installing and configuring the A3 software for an implementation using multiple forms of external authentication. Hybrid Out-of-Band Enforcement This guide assumes that A3 is deployed in hybrid out-of-band mode. In the figure below, clients use the access network (via an Extreme Networks access point in this case) to seek general network access, typically to an organization’s local networks or the Internet.
Overview Equipment Requirements To install and operate A3, you will need a computer system that meets the following requirements: 1. 2. An x86-based VMware VSphere Hypervisor (ESXi) host with the following resources available: a. Running version ESXi 6.0 or higher b. 4 CPUs c. 16GB RAM d. 250GB storage e. Access to the management VLAN. An Extreme Networks access point running version 6.5 or newer software, with version 8.3r4 or higher recommended.
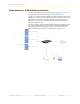
Overview Network Requirements Several computer and networking components are required and should be connected as shown below. Layer 2 connectivity is required for the examples in this guide. No VLANs are described here; it is assume that all devices use a single management VLAN. The required components are: Network Component Usage A3 DHCP Server Active Directory Server w/ DNS ESXi server that is the host for A3. See Equipment Requirements. A server used to supply client addresses.
Overview Part Number: 9036855-02 Rev AA A3 Quick Start Guide Community 6
A3 Installation and Initial Configuration A3 Installation and Initial Configuration A3 Installation A3 can be installed on an x86-based host using VMware VSphere Hypervisor (ESXi) or Microsoft Windows Server 2019 with a Hyper-V role. This user guide assumes the former installation. Installation of the Hyper-V version is covered in the Installation and Usage Guide - No VLAN Version. The ESXi web management interface is used to initialize a virtual machine and start A3.
A3 Installation and Initial Configuration c. Enter the following commands to set up your network using parameters applicable to the network that A3 is installed in. network ip 10.150.1.4 network netmask 255.255.255.0 network gateway 10.150.1.1 network dns 10.150.1.5 show network d. Verify your settings in the display. e. Enter the following: reboot y 11. The display should appear as below. Note the address shown in that window.
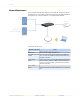
A3 Installation and Initial Configuration Network Addresses, VLANs and Other Specifications A3’s initial configuration is based on the network layout shown in Network Requirements. The following figure repeats the network diagram with assigned addresses. The addresses shown below and in the following chart will be used in this guide in the form value (X). (X) corresponds to the letter in the Key column of the table.
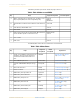
A3 Installation and Initial Configuration It would be a good idea to print out this and the next page for reference. Table 1: Table of Addresses and VLANs Key Usage Suggested Assignment A Address of the A3 instance on the ESXi server. This address is initially assigned by DHCP, but can be changed during setup. 10.150.1.4 Netmask 255.255.255.0 A* Virtual IP address needed for clusters. Must be in same network as (A). 10.150.1.254 D Active Directory (AD) and DNS server. 10.150.1.
A3 Installation and Initial Configuration A3 Initial Configuration The initial configuration of A3 sets up some basic networking and naming parameters. Use the following steps to complete the process. 1. Using your browser enter the URL obtained from the last step of A3 Installation. You may receive a warning about your connection not being private, as shown for the Chrome browser1 below. 2. Click the Advanced button and select Proceed. 3. Select GET STARTED from the New Deployment box. 1.
A3 Installation and Initial Configuration Part Number: 9036855-02 Rev AA 4. The next screen will ask you for your email address and a password. The email that you enter will be your primary login name going forward. Make sure to use a valid email address that you have access to. Select Next. 5. On the next screen you will set the A3’s network and VIP addresses. The initial screen is shown below. Make the following changes in the indicated order. a. VIP.
A3 Installation and Initial Configuration 8. When A3 says configuration is complete, its services will start. This can take a few minutes. Wait for all services to start. 9. Enter the A3 configuration interface by selecting GO TO ADMINISTRATIVE INTERFACE or invoking the interface via https://<(A*) address>:1443. 10. Log in with the credentials that you used in step 4. 11.
A3 Installation and Initial Configuration 3. a. Recipients: one or more email addresses for those who will receive alert messages. b. SMTP server: you may fill in a local SMTP server or use GMAIL or any public mail service for which you have credentials. If you wish to use GMAIL, enter smtp.gmail.com. c. SMTP encryption: enter the type of encryption appropriate for your SMTP server. GMAIL uses ssl. d. SMTP port: enter the port number appropriate for your SMTP server. GMAIL uses port 465. e.
A3 Installation and Initial Configuration Certificate Installation (Optional) When A3 is installed it generates a self-signed certificate for use in the captive web portal, which will be accessed in the management portal and with URLs that begin with https://A3Eval.example.com/ (https://./), corresponding to the value entered on the General Configuration page. In a production system, you would use a domain that you own and use a public certificate authority to generate a certificate for the A3 CWP.
A3 Installation and Initial Configuration Part Number: 9036855-02 Rev AA A3 Quick Start Guide Community 16
SMS Authentication with Captive Web Portal In this A3 example implementation you will perform SMS-based authentication of users desiring to obtain access to the network. Users will receive an SMS message with a PIN that they will need to enter in a captive web portal page. Their device will be registered to the phone number supplied during the registration process. To do this, we will configure both A3 through its administration interface and the access point through ExtremeCloud IQ.
SMS Authentication with Captive Web Portal Network Policy A new network policy is defined by selecting POLICIES. Select ADD NETWORK POLICY. from the sidebar and then NETWORK 1. Fill in the Policy Details: check the Wireless box only and enter Corp-Policy as the Policy Name. 2. Click 3. Select ADD NETWORK and then All Standard Network. 4. Enter A3-Guest (b) in the Name (SSID) field. The Broadcast Name is automatically filled in as A3-Guest as well. to move to the Wireless Networks tab.
SMS Authentication with Captive Web Portal Do not change the Server Type Authentication or Accounting ports from 1812 and 1813, respectively. 3. A RADIUS Server group is defined next. This is a set of RADIUS servers that can be queried by access points. In this example, we will only be adding one RADIUS server, our A3 instance. Click the sign beside Default RADIUS Server Group. 4. In the Configure RADIUS Servers dialog, select EXTREME A3 (0) and click the to add a new RADIUS server.
SMS Authentication with Captive Web Portal 6. The means by which A3 ensures proper guest access by sending RADIUS attributes to the access point upon MAC authentication. The access point uses these attributes to assign user profiles. To start authentication, every user must register with A3. The default profile is used when no RADIUS attribute rules have been satisfied, placing the user in the Registration state. Continue down the screen past Authenticate via RADIUS Server to User Access Settings. 7.
SMS Authentication with Captive Web Portal iii. Select d. to save the rule. Similarly define additional rules as per the table below in the order indicated. Services Source IP DHCP-Client, any DHCP-Server, DNS HTTP, HTTPS any any any Part Number: 9036855-02 Rev AA Destination IP Action any Permit any any Redirect Deny e. Set the Redirecting URL to https://A3-Eval.example.com/Aerohive::AP. This invokes A3 when a registering user attempts to reach any web page. f.
SMS Authentication with Captive Web Portal 10. Select to save the new user profile. 11. Back at the Wireless Network definition page, select Apply a different user profile to various clients and user groups. This enables the use of multiple user profiles on a single SSID. 12. Select Allow user profile assignment using RADIUS attributes in addition to three tunnel RADIUS attributes. This results in a selection of Standard RADIUS Attribute and a value of 11_Filter-Id.
SMS Authentication with Captive Web Portal Guest User Profile 1. Select above User Profile Name to obtain create a Guest User Profile with a different set of firewall rules. The management VLAN (VLAN1) will continue to be used. Enter Guest-NV into the User Profile Name. 2. If your management VLAN is not displayed, select the VLAN. 3. Turn on Firewall Rules. 4. Name the IP Firewall Guest-NV-FW. 5. Select the icon beneath the IP Firewall Name, select Guest-Internet-AccessOnly, and then .
SMS Authentication with Captive Web Portal Isolation User Profile An isolation user profile is necessary to handle exception cases signaled by A3. A3 will send the access point a isolation RADIUS attribute in that case, which will be treated as a return to registration state. 1. Select 2. Select the above User Profile Name and select Registration-NV. 3. Enter the name Isolation-Rule-NV in the Name field, click the RADIUS Attribute. 4. Note that 11_Filter-Id has been preselected.
SMS Authentication with Captive Web Portal A3 Configuration A3 configuration requires definition or modification of several A3 settings: 1. Roles - classifies the type of user and the number of concurrent devices a user with this label can have. In this case, a predefined guest role will be used. 2. Authentication Sources - defines how user information is to be gathered and ties users to roles. The predefined sms authentication source will be used. 3.
SMS Authentication with Captive Web Portal Authentication Sources The next steps involve selection and modification of the SMS authentication source. Part Number: 9036855-02 Rev AA 1. Select Authentication Source from the list on the left, below Roles. 2. Click the sms source in the External Sources box. 3. The sms dialog is displayed. The SMS Carriers box is pre-populated with a large number of supported carriers. You may leave the list alone, or pare it down.
SMS Authentication with Captive Web Portal 5. The catchall Authentication Rule states that anyone authenticating against this source will be assigned to the role of guest and allowed to use the network for 1 day before needing to re-register. No modification to this rule is required. 6. Click to save the authentication source. Devices Device configuration is next: 1. Click Devices beneath Network Devices. The list of predefined entries is displayed. 2. A device for our access point must be defined.
SMS Authentication with Captive Web Portal 6. Enter registration (f), isolation (g), and guest (h) next to the same-named entries. This dictates which RADIUS value will be returned to the access point for each A3 role and must match what was entered in Guest Assignment Rules step 3. Values are case sensitive. (f) (g) (h) 7. Part Number: 9036855-02 Rev AA Select the RADIUS tab. Enter 8AB7tHkP (a) into the Secret Passphrase field.
SMS Authentication with Captive Web Portal Connection Profile The connection profile ties together the access point’s SSID with authentication sources. To define a new profile: 1. Select Configuration > Connection Profiles > New Connection Profile. 2. Fill in a profile name and description. 3. Uncheck 802.1X Recompute Role from Portal since we are not using 802.1x authentication in this example. 4. Under Filters, click , select SSID from the list, and enter A3-Guest (b) next to SSID.
SMS Authentication with Captive Web Portal Testing the SMS Example To test the A3 and ExtremeCloud IQ configurations for SMS authentication, use a laptop, smart phone, or tablet to connect to the A3-Guest (b) SSID. Depending on your configuration, your default browser might automatically open with a reference to the URL https://A3-Eval.example.com/ (https://./), or it may be necessary for you to reference a popular web site such as http://aerohive.
SMS Authentication with Captive Web Portal Scrolling the web page down you will be asked to accept the use policy. Select that to receive a screen that asks you for your phone number and choice of mobile carrier. When you click Continue, A3 will email your mobile number at your carrier and the SMS will come through with a PIN. The PIN is then entered into the web page, followed by Continue. A success page is displayed with a progress bar letting you know you are being moved to the user VLAN.
SMS Authentication with Captive Web Portal Verifying Operation In addition to successful authentication and network access, you can use A3’s auditing function to check on the status of the authentication. Select Auditing from the top menu bar and use the Search facility to look for the client device; in this case the search was for the last component of the client’s device (:a5). Items are displayed in reverse order.
Active Directory Authentication In this A3 example you will perform differentiated authentication based on Active Directory information. Users in marketing and sales security groups in the organization’s Active Directory will be assigned to user profiles that allow them access to potentially different network resources. Users in neither group will be assigned to a third VLAN. In this chapter, you will configure both the access point through ExtremeCloud IQ and A3 through its administration interface.
Active Directory Authentication Network Policy A new network policy is defined by selecting CONFIGURE from the top menu and NETWORK POLICIES just below it. 1. If a network policy has previously been defined, as would be the case if you followed the instructions for the SMS Authentication with Captive Web Portal example, then you will see the CONFIGURE page to that shown below. (b) 2. 3. Part Number: 9036855-02 Rev AA If a network policy is displayed, then: a. Click the figure above). b.
Active Directory Authentication Authentication 1. Since the SSID will be used for employee access, select Enterprise below SSID Authentication. (c) 2. 3. A RADIUS Server group is a set of RADIUS servers that can be queried by access points. If you have previously defined a RADIUS server group in a previous example, you can reuse it. a. Click the b. Place a check mark beside the previously defined server group name. c. Click . If a server group has not been defined yet. a.
Active Directory Authentication ii. c. Do not change the Server Type Authentication or Accounting ports from 1812 and 1813, respectively. Select the gear icon ( is enabled. . In the dialog presented ensure that CoA (RFC3576) Fill in the Extreme Networks A3 Server dialog: i. Name: A3-RADIUS. ii. Description: as desired. iii. IP/Host Name: use the sign to add the A3 VIP address 10.150.1.254 (A*) as the Host Name and IP Address. iv. Shared Secret: 8AB7tHkP (a).
Active Directory Authentication 7. Select the Allow user profile assignment using RADIUS attributes in addition to three tunnel RADIUS attributes check box. This results in a selection of Standard RADIUS Attribute and a value of 11_Filter-Id. This means that the access point’s profile assignment will key off of the value of the 11_Filter-Id RADIUS attribute received from A3. (B) User Profiles 1.
Active Directory Authentication Assignment Rules 1. After the profiles have been created, it is necessary to tell the access point to assign these profiles when A3 sends back the proper RADIUS attribute. Select the on the Sales line in the Assignment Rules column. 2. Enter the name A3-Sales-Rule-NV in the Name field, click the RADIUS Attribute. 3. Note that 11_Filter-Id has been preselected. Fill in the Attribute Values field with sales (i).
Active Directory Authentication Deploy Policy Select the Deploy Policy tab, then check the box for your access point, and then UPLOAD. Check Update Network Policy and Configuration. Click . Before continuing, note the IP Address of your access point, this corresponds to the (E) address in table. This completes the ExtremeCloud IQ configuration.
Active Directory Authentication A3 Configuration Authentication setup then requires definition or modification of several A3 settings: 1. Active Directory Domain Join - adds the A3 server to the Active Directory used for authentication. 2. Roles - classifies the type of user, in this case three roles for employees, sales group members, and marketing group members will be used. 3. Authentication Sources - defines how user information is to be gathered and ties users to roles.
Active Directory Authentication Follow these steps to add the A3 server to your Active Directory domain: 1. Select Configuration > Policies and Access Control > Active Directory Domains. 2. Select 3. Enter the information as shown below, based on the information gathered earlier: . (e) (D) (D) Part Number: 9036855-02 Rev AA 4. Click . 5. Enter the administrator account and password that has privileges to join the domain.
Active Directory Authentication 6. If the Join fails, you can try again using the same credentials using the Try Again button, or try again by using the Cancel button and then the Join button on the Domains page. 7. You may receive an error indicating that a DNS record for the AD server could not be defined. If this is the case, please add an A-record for your A3 server (A3-Eval) to your DNS server.
Active Directory Authentication Roles Roles are accessed through the following steps: 1. Select Configuration > Policies and Access Control > Roles. 2. Select 3. Create a Sales role by entering Sales into the Name field. Click 4. Repeat the last step for the Marketing role. 5. Do the same for the Employee role. . . Authentication Sources The next steps involve creation of the CorpAD authentication source. Part Number: 9036855-02 Rev AA 1.
Active Directory Authentication 3. Part Number: 9036855-02 Rev AA Fill in the form as shown below, with: a. Name: CorpAD. b. Description: as desired. c. Host: 10.150.1.5 (D) - the Active Directory server. d. Base DN: CN=Users,DC=EXAMPLE,DC=COM. This is the base AD tree location to start a user search from. e. Scope: Subtree. This allows the search to progress to the entire tree beneath the Base DN. f. User Name Attribute: sAMAccountName. This is the normal AD entry for the user’s name. g.
Active Directory Authentication (D) Part Number: 9036855-02 Rev AA 4. Click Authentication Rules at the bottom of the page. 5. Add a Sales rule that matches Sales group membership in Active Directory. Enter: a. Name as Sales. b. Description as desired. c. Click on d. Select Conditions to match the user’s AD membership: . i. Drop down the first field to memberOf. ii. Drop down the second field to equals.
Active Directory Authentication iii. Enter CN=Sales,CN=Users,DC=EXAMPLE,DC=COM. LDAP distinguished names must be used as the search string. d. In the field beside Role, under Actions, select Sales. e. Click the plus sign next to Sales. In the new action, i. Change Role to Access Duration. ii. Change the period to 2 days. 6. Click the plus sign to the right of Sales adjacent to Authentication Rules.
Active Directory Authentication Devices Device configuration is next: 1. Click Devices beneath Network Devices. The list of defined entries is displayed. 2. If the list includes the highlighted device, i.e. the address of your access point 10.150.1.19 (E), then select that entry and skip to step 5. 3. A device for our access point must be defined. Select Aerohive_AP. 4. In the New Device form, enter the IP address of your access point 10.150.1.
Active Directory Authentication (g) (i) (j) 6. Select the RADIUS tab. Enter 8AB7tHkP (a) into the Secret Passphrase field. This matches the setting entered in the ExtremeCloud IQ in Authentication. Click Create. Connection Profile The connection profile ties together the access point’s SSID with authentication sources. To define a new profile: 1.
Active Directory Authentication 2. Fill in a Profile Name and Profile Description as shown below. 3. Check Automatically Register Clients. This ensures the device is registered to A3 and allowed to connect to the 802.1X-secured SSID. 4. Uncheck 802.1X Recompute Role from Portal. 5. Under Filters, click Add a filter and enter A3-Corp-NV (c) next to SSID. This tells A3 to use this connection profile when anyone connects to the access point using the A3Corp-NV (c) SSID. 6.
Active Directory Authentication Testing the Active Directory Example To test the A3 and ExtremeCloud IQ configurations for Active Directory authentication, use a laptop, smart phone, or tablet to connect to the A3-Corp-NV (c) SSID. Active Directory Contents The testing in this guide section depends on a particular configuration of your Active Directory server.
Active Directory Authentication 4. Connect to the A3-Corp-NV (c) SSID and enter credentials for jsales, who is a member of either the Sales AD group: 5. After the successful connection, look at the properties for the WiFi connection: Note that the address assigned is from the Sales User Profile configured in ExtremeCloud IQ. 6. Repeat step 4 if you intent to reuse the same client for further testing. 7.
Active Directory Authentication Verifying Operation In addition to successful authentication and network access, you can use A3’s auditing function to check on the status of the authentication. Select AUDITING from the top menu bar and then RESET SEARCH from the page. Items are displayed in reverse order. You should see an Accept Auth Status for your client. If you click the Accept button for any entry and select the RADIUS tab, you can see the RADIUS messages exchanged between A3 to the access point.