ExtremeLocation Demo App User Guide 9036013 Published January 2019
Copyright © 2019 Extreme Networks, Inc. All rights reserved. Legal Notice Extreme Networks, Inc. reserves the right to make changes in specifications and other information contained in this document and its website without prior notice. The reader should in all cases consult representatives of Extreme Networks to determine whether any such changes have been made. The hardware, firmware, software or any specifications described or referred to in this document are subject to change without notice.
Table of Contents Preface......................................................................................................................................... 4 Conventions............................................................................................................................................................................. 4 Providing Feedback to Us........................................................................................................................................
Preface This section discusses the conventions used in this guide, ways to provide feedback, additional help, and other Extreme Networks® publications. Conventions This section discusses the conventions used in this guide. Text Conventions The following tables list text conventions that are used throughout this guide. Table 1: Notice Icons Icon New! Notice Type Alerts you to... General Notice Helpful tips and notices for using the product. Note Important features or instructions.
Preface Terminology When features, functionality, or operation is specific to a switch family, such as ExtremeSwitching, the family name is used. Explanations about features and operations that are the same across all product families simply refer to the product as the switch. Providing Feedback to Us Quality is our first concern at Extreme Networks, and we have made every effort to ensure the accuracy and completeness of this document.
Preface • • The device history (for example, if you have returned the device before, or if this is a recurring problem) Any related RMA (Return Material Authorization) numbers Subscribing to Service Notifications You can subscribe to email notifications for product and software release announcements, Vulnerability Notices, and Service Notifications. 1 Go to www.extremenetworks.com/support/service-notification-form. 2 Complete the form with your information (all fields are required).
1 Create Your Experience Create the Demo Payload Create Your Payload Create an Experience ExtremeLocation uses Bluetooth Low Energy (BLE) beacons to provide locationing services to all the sites managed by your ExtremeLocation account. Use these BLE beacons to provide location based services like targetted advertisements, offers/coupons, surveys to enhance the user's experience of your offerings. BLE beacons provide accurate locationing of about 1-3 meters (3-9 feet).
Create Your Experience For the iOS Demo App, you can use an iPhone or an iPad. For the Android Demo App, you can use any device that supports the latest Android version. Note For the purpose of this guide, it is assumed that you have already: • created your sites, floors, and categories. Note Refer to the ExtremeLocation Quick Start Guide for more information.
Create Your Experience Key Description type The value of this key indicates the type of the payload. This value can be one of the following: • image • video • html • url engagementType This value of this key indicates the type of user engagement. User engagement can be one of prompt or autoshow. • • prompt - When this value is set, a prompt is displayed to the user.
Create Your Experience "type":"url", "engagementType":"prompt", "engagementTitle":"Sample URL Payload", "engagementDescription":"This is a sample URL payload.", "content":"https://en.wikipedia.org/wiki/Orion's_Belt" } Example HTML Payload { "type":"html", "engagementType":"prompt", "engagementTitle":"Sample HTML Payload", "engagementDescription":"This is a sample HTML payload.
Create Your Experience For a new payload, provide the following information that identifies this payload. Name Provide a name for this payload. Payload name cannot be longer than 32 characters. Description Provide a description for this payload. The description should be such that you can easily identify the purpose of this payload and its contents. 3 Select the Settings menu item to configure the payload's settings. 4 From the Content Type drop-down list, select the payload type as Demo.
Create Your Experience 5 Paste the JSON structure of your payload into this field. Note You need not make any more changes to the fields in this screen. The values of the other fields in the screen are populated by ExtremeLocation using the contents of the JSON structure. The following is an example of a video payload. { "type":"video", "engagementType":"prompt", "engagementTitle":"Idle_PL", "engagementDesc":"Idle_PL", "content":"https://www.youtube.
Create Your Experience Create an Experience An Experience is used to deliver a payload when a set of conditions are satisfied. Use an experience to enhance the user's experience when visiting your site by providing targeted multimedia advertisements or coupons or other such information that are only active and valid in particular regions of your site. An experience consists of various configuration options that control its following components.
Create Your Experience To create a new experience, select the icon located to the top right of the Experience screen. Add General Information When a new experience is created, the General Information screen displays.
Create Your Experience 1 Provide the following information for the new experience. Field Description Name Provide a name for this experience. The name should be such that it identifies this experience uniquely among other experiences. Description Provide a detailed description for this experience. A detailed description could contain information such as the purpose of the experience, the payload it delivers, and other information that identifies the experience.
Create Your Experience 2 Use the Add Payload button to select an existing payload. The Choose Payload screen displays. 3 From the list of the available payloads, select the demo payload that you created earlier to highlight it. 4 Select OK button to confirm your selection. The selected payload is added to your experience. 5 Select the SAVE button to save the changes made to this screen. At any time select the Cancel button to exit without saving the changes made to this screen.
Create Your Experience Add Category Note Only existing categories can be added to this experience. You cannot create categories using this Categories screen. The Category tab sets the categories that can trigger this experience. 1 Select the Categories tab from the left menu tree. The following screen displays. 2 Select the Add Categories button to add the appropriate categories to this experience. 3 Select the SAVE button to save the changes made to this screen.
2 The Demo App Login to the Demo App The History Tab The Account Tab Introduction The ExtremeLocation Demo App is an application that demonstrates how you can use the ExtremeLocation BLE based micro-locationing feature to deliver great customer experiences. The ExtremeLocation Demo App is available for both the Google™ Android and Apple™ iOS.
The Demo App Extreme Networks recommends that you create a few payloads and experiences that are for exclusive use by the ExtremeLocation Demo App. Launch the ExtremeLocation Demo App using the icon from your device's screen. A login screen is displayed. Enter the credentials for your ExtremeLocation account. Please note that the ExtremeLocation Demo App will not work properly without access to your ExtremeLocation account. On successful login, the Home screen displays.
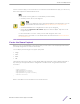
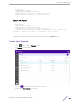
The Demo App The Home screen is intentionally blank and is reserved for future use. The History Tab The History tab of the ExtremeLocation Demo App displays a list of all events captured by this device. It indicates the type of payload and you can use the screen to play/view the payloads delivered to this device in the past. Every time a payload is received through an experience, it is added to this list.
The Demo App Figure 1: The History Tab When a received payload is set to be automatically played on your device, the ExtremeLocation Demo App calls the appropriate player to display/play the payload. At any time, you could choose to review a received payload. To do so, select the payload from the list in the History tab. The app calls the appropriate player to display/play the payload. The following image is of a URL payload being loaded in its default application.
The Demo App Figure 2: A URL Payload Use the Clear History button to clean up the payloads list. The Account Tab The Account tab displays basic information about the ExtremeLocation account used in the ExtremeLocation Demo App. The following screen displays.
The Demo App Select the Sign Out button to logoff from the ExtremeLocation Demo App, ExtremeLocation Demo App User Guide 23