
Specifications


10
Ridgeline Concepts and Solutions Guide
135
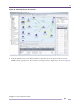
4 Click one of the devices to view the Available ports table for the device.
5 For each port or link you want to add to the VLAN, select the port and click the Add tagged or Add
untagged button. When the VLAN is created, the port is removed from the default VLAN and
added to the new VLAN.
6 Edit the values in the Tag and Name fields for the new VLAN.
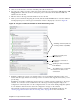
7 When you have finished configuring the VLAN, click the Create VLAN button to start the validation
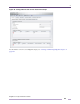
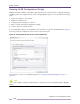
and deployment process. The Progress and Results window is displayed, as shown in Figure 92.
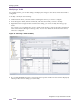
Figure 92: Progress and Results Window for VLAN Provisioning Tasks
8 Ridgeline validates the options you selected against a set of predefined configuration rules, and
ensures that the target switches are running a version of software that supports the features you are
provisioning.
If Ridgeline successfully validates the selected options, it verifies network connectivity to the target
switches. If a connection can be established to all of the target switches, Ridgeline deploys the
configuration commands, then saves the configuration file on each switch. Finally, Ridgeline updates
its own database with information about the configuration changes on the switches.
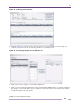
The information in the Progress and Results window is logged in the Ridgeline Audit Log. See
“Viewing Logged Information about Provisioning Tasks” on page 84 for more information.
Validating command syntax and
checking software compatibility
Verifying connectivity to the
selected devices
Deploying the commands on
the devices
Updating the device information
in the database
The validation rules or commands
entered on the device for the
selected task