® Painted Steel Tool Cart Model: EX3304TC 33” 4 Drawer Deluxe Tool Cart with Bumpers Extreme Tools, Inc. 740 Frontenac Road Naperville, Illinois 60563 630.369.9303 www.ExtremeTools.
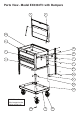
Parts View - Model EX3304TC with Bumpers 17 8 14* 6 18 2 12 1 3 7 15* 10 4 13 11 *14 & 15 are drawer slides located on the interior of the cart 16 5 19
Parts List - Model EX3304TC ITEM NO. PART NUMBER DESCRIPTION QTY. 1 3304-00 (V2) BODY WELDMENT 1 2 DR1-3304 V2 DRAWER 1 2 3 DR2-3304 V2 DRAWER 2 2 4 3304-29 V2 POST 4 5 3304-26 V2 BTM TRAY ASSEMBLY 1 6 Z-TCBUMPER (TRIMMED) CORNER BUMPER 4 7 Z-SCM6-12MM M6-1.0X12 SOCKET HEAD SCREW 4 8 GAS STRUT(300) 300mm FULLY EXTENDED 2 9 3304-30 LOCK COVER (NOT SHOWN) 1 10 Z-M8 NUT (SPUR WASHER) M8 NUT W/ SPUR WASHER 8 11 Z-M8X14FHS M8 X 14mm FLAT HD SC. 8 12 M8-1.
Tool Cart Assembly Remove Drawers Remove all drawers before installing the posts. a. Pull out the drawer so that it is almost fully extended. Pull up on the black release lever on one side while pushing down on the release lever on the other side of the drawer. b. While holding the levers in the release positions, pull the drawer out until it is fully released from the drawer slides. c. LOCK TOOL CART LID! Post Installation a.
Bottom Tray Installation Tray is heavy and may require 2 adults to install. a. After installing the four (4) posts, attach the bottom tray. Align the holes of the four corners of the bottom tray with the holes located on the bottom of the posts as shown right. b. Use two (2) flat head M8 x 14mm Flat Head Phillips Screws and M8 Nut with Spur Washers (Part # 10 & 11) for each corner to attach bottom tray. Tighten all screws securely.
Drawer Replacement a. BE SURE BRAKES ARE ENGAGED ON ALL CASTERS! b. NOTE: This step requires 2 adults to complete safely. Flip the tool cart into its upright position. c. Unlock the lid. Starting at the bottom, extend the drawer slides. Align the brackets on the sides of the drawers with the slots in the extended slides. Insert the brackets onto the slides being careful to keep the two sides evenly positioned. d.
Insert Drawer Liners a. Open each drawer and place a drawer liner in each drawer. b. Disengage the brakes to move the tool cart. Engage brakes when tool cart is not being moved.
OPERATING PROCEDURE Drawer Removal Pull drawer out so that it is almost fully extended. Push up on the black lever on one drawer slide and at the same time push down on the lever on the other side. With the levers in these positions, pull the drawer out until it releases from the drawer slides. Drawer Replacement Extend the drawer slides. Carefully align the brackets on the sides of the drawers with the slots of the cabinet slides.
SAFETY WARNING Do not attempt to lift the cabinet by its side handle using chains, ropes or lifting device. Side handle may fail resulting in personal injury or damage to the product! Use a forklift or similar lifting device with forks placed under the bottom of the tool box to move if tool box cannot be moved by two people.