
User's Manual

2
VNM Enterprise Controller • Setup Guide (Continued)
a. Configure the network settings of a control PC so that it is
using an IP address within 192.168.254.1 to 192.168.254.253
and a subnet mask of 255.255.255.0. Connect the control PC to
the VN-Matrix network.
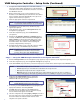
b. Open a web browser on the control PC and type in the
IP address of the VNM Enterprise Controller into the address
bar (for example, http://192.168.254.254). The login screen
appears in the browser (see figure 2).
c. Enter the appropriate username and password.
NOTE: The default username is admin. By default,
no password is required. Entries are case sensitive.
d. Click Login or press the <Enter> key. The Devices page
appears (see figure 3).
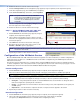
e. From the Devices page, click the Configuration tab. The
Configuration page appears.
f. From the Configuration page, click the Network link
(see figure 4).
g. Change the IP Address, Netmask, and Gateway fields as
necessary. The MTU field does not need to be changed. Click
Apply Changes, located at the lower right corner of the
web page, to save the configuration. The VNM Enterprise
Controller restarts. The controller network settings are
properly configured after powering up.
h. Configure the IP address of the control PC so that it is within
the address range of the VNM Enterprise Controller.
NOTE: Complete this step only if the IP address of the
VNM Enterprise Controller is using a network
prefix or subnet other than 192.168.254.xxx.
i. If necessary, restart the control PC to save the configuration.
Step 6 — Set Up the VNM Enterprise Controller as the System Controller
a. Click the Configuration tab. The Configuration page appears (if login is required, follow steps 5b through 5e).
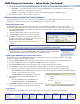
b. From the Configuration page, click the System config link (see figure 5).
c. From the Protocol drop-down menu, select the transport protocol that will be used throughout the VN-Matrix system.
NOTES: • The default transport protocol is unicast.
• Unicast supports up to four simultaneous streams from a single encoder.
• TCP supports a single stream from a single encoder.
• Multicast supports a single stream that can be used by multiple decoders. This protocol requires a
network that supports Internet Group Management Protocol (IGMP) snooping for correct operation.
d. Ensure that the Clean Switch option is checked to
enable smooth transitions when switching between
VN-Matrix 200 / 225 device streams.
NOTE: VN-Matrix 300 / 325 devices do not support
Clean Switch and will ignore this setting.
e. If necessary, clear the Controllers field by highlighting the
displayed IP addresses and clicking Delete.
f. Click Add. Enter the IP address of the VNM Enterprise
Controller (use the IP address that was created in step 5g)
into the window that appears and click OK.
g. Save the configuration by clicking Apply Changes, located at
the lower right corner of the web page. The VNM Enterprise
Controller restarts the web-based user interface and is
assigned as the system controller.
Figure 2. Enterprise Controller Login Page
Figure 3. Devices Page
Figure 4. Network Configuration Page
Figure 5. System Configuration Page