
User's Manual

QGE 100 • Setup Guide (Continued)
2
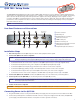
Front Panel Features
STATUS
LAN
QGE 100
QUANTUM GRAPHICS ENCODER
1
2
3
a
Power LED (green) — Lights when the unit has power.
b
LAN LED (amber) —
z Blinking: Data is being transmitted.
z Unlit: No data is being transmitted or no source is connected.
c
Status LED (amber) —
z Lit steadily: The unit is connected to a valid source and is functioning normally.
z Blinking regularly: The unit is functioning normally; no source is connected.
z Unlit: The unit is not functioning correctly.
NOTE: When the QGE 100 is powered on, the three LEDs light steadily for approximately 10 seconds.
Configuring the QGE 100
To set up the QGE 100, use the QGE 100 Administrator software, which is provided with the product on the Extron
Videowall Processing CD.
1. Install and start the QGE 100 Administrator program:
a. Load the Videowall CD in the external disk drive of your viewing computer.
b. On the external root directory of the CD, locate and double-click the Administrator icon, located at:
QGE 100\Software\QGE 100 Administrator\QGE 100 Administrator Vn.nn.exe. The installation wizard opens.
c. Follow the instructions on the wizard screens to complete the program installation.
d. On your desktop, click Start > All Programs > Extron Electronics > QGE 100 > QGE 100 Administrator >
QGE 100 Administrator. The main application window opens with the QGE 100 List section displaying all QGE 100s
detected on the network.
2. Log in as administrator by selecting Log in from the Admin menu and entering Admin (the
default password) on the Log in: Password screen. This enables you to access the fields in the
Configure QGE 100 Properties section.
3. On the QGE 100 list, click the name of the QGE that you want to configure, then click the
Connect button.
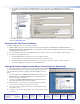
4. In the Performance Settings section under Configure QGE 100 Properties, select the following settings:
z Frame Rate Limit: From this menu, select the refresh rate (number of frames per second) (5 is recommended).
z Bandwidth Limit: From this menu, select the maximum possible flow of data streaming onto the network (5000 is
recommended).
5. Make changes to the network settings as desired:
a. In the Network Settings section, click the Advanced Network Settings button. The Network Settings screen opens.
b. The factory default IP address for the QGE 100 is 172.28.231.98. To change this, enter a new address in the
IP Address field on the Network Settings screen.
c. Enter subnet mask, gateway, DNS server, and WINS server addresses as appropriate. You can also enter a name for
the QGE and select the network speed from the drop-down menu.
d. When finished entering network settings, click OK to close the Network Settings screen and enable your changes.