
User's Manual
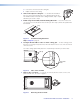


e. Cut out the circle traced in the ceiling tile.
f. Replace the tile in the ceiling.
4. Remove the adjacent ceiling tile — To facilitate the installation
process, remove the tile adjacent to the ceiling tile where the CS
26T will be installed. If the CS 120P is being installed, skip to step 6.
Otherwise, proceed to step 5.
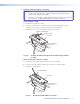
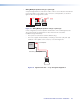
5. If NOT using the CS 120P, install the Ceiling Mount kit — Place two V-rails and
one C-ring across the tile above the hole that you cut in step 3, where the speaker will
be installed.
V-rail
C-ring
Figure 3. Install the Ceiling Mount Kit
Skip to step 12 on page 8.
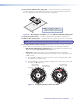
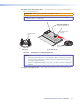
6. Configure the CS 120P for a U.S. or metric ceiling grid — For U.S. ceilings (2 feet
by 2 feet or 2 feet by 4 feet) leave intact the four tabs that are on one of the short ends
of the enclosure.
For metric ceilings (600 mm by 600 mm or 600 mm by 1200 mm) cut off the tabs.
Tabs (4)
Removable
Tabs
Figure 4. Tabs on the CS 120P
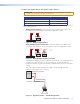
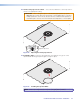
7. Remove the cover plate — Loosen (do not remove) the two screws on the cover
plate and remove it, as shown in figure 5.
Cover Plate
Figure 5. Removing the Cover Plate
CS 26T and CS 120P User Guide • Installation 5