
User's Manual


Connection and
Configuration
This section discusses how to connect and configure the IPL T CR48. Topics that are covered
include:
Connecting the Hardware
Configuring the Hardware
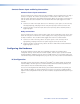
Connecting the Hardware
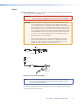
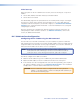
To connect the IPL T CR48, connect the input and output devices to the unit using figure 9
as a guide.
LAN
POWER
12V
0.5A
INPUT
2
1
3
4
5
6
7
8
1
2
3
4
TCP/IP
Network
Extron
IPL T CR48
Ethernet Control
Interface
Projector
Lighting System
Screen
Control
Projector
Lift
Control
Blinds
GlobalViewer
®
A/V Resource
Management and
Remote Control
Application
Figure 9. Example Application
Ethernet Connection
This type of connection is used on an ongoing basis to connect the IPL T CR48 to a LAN and
to control switching and display devices through the unit.
1. Plug one end of a CAT 5, straight-through Ethernet cable into the rear panel Ethernet
connector on the IPL T CR48. See figure 7 for RJ-45 connector wiring.
2. Plug the other end of the Ethernet cable into a network switch, hub, or router
connected to an Ethernet LAN or to the Internet.
3. Launch your Web browser on your PC and type the Web address that you set up on the
IPL T CR48 (see IPL T CR48 Interface Configuration later in this section) in the Address
field of the browser. The IPL T CR48 default Web page is displayed.
IPL T CR48 • Connection and Configuration 10