
User's Manual

Editing and adding e-mail alerts
If you have created scheduled events or monitoring tasks on the IPL T CR48, you can write
an e-mail alert with a message corresponding to that event or task (for example, a timer
notification indicating it is time to replace a projector light bulb). The e-mail alert can notify
up to eight recipients at one time.
To edit notification e-mail addresses from the Email Alerts page:
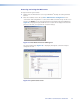
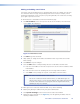
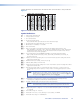
1. Click Email Alerts on the menu (on the left side of the window). The Email Alerts
screen (figure 18) is displayed.
Figure 18. Email Alerts screen
2. Click Edit to go into edit mode.
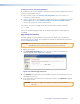
3. Add, update, or change the IP address and domain name of your mail server under
Email Settings.
4. Click Save to keep the changes.
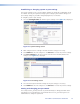
5. Click the Edit buttons to independently edit each e-mail address and file name.
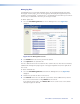
a. Enter the e-mail address of the alert recipient in one of the numeric mailboxes under
Email Address.
b. Enter the name of the file containing the alert message under File Name.
c. Click Save to keep changes to recipient e-mail addresses and file names.
NOTES: File names must end with an *.eml extension.
Due to the 7-character limit for full file names, it is advised that you use
numeric titles (such as 1.eml or 24.eml). Numeric titles reduce the characters
of the file name and assist in keeping the alert files organized. However,
alphabetical titles are permitted.
To finalize your new e-mail alerts within the Web server, do the following:
6. Obtain your gateway IP address from your system administrator.
7. Click System Settings on the menu on the left side of the window.
8. Within the System Settings screen (figure 15), enter the gateway IP address into the
Gateway IP Address field.
IPL T CR48 • Communication and Control 20