
User's Manual
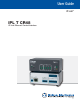


Installation and
Operation
This section describes the installation and the operation of the IPL T CR48. Topics that are
covered include:
Installation Overview
Mounting the IPL T CR48
Rear Panel Features and Cabling
Operation
Installation Overview
To install and set up the IPL T CR48, follow these steps:
1. Turn all of the equipment off. Make sure that the input devices (such as motion
detectors and alarms), the IPL T CR48, and the output devices (such as projectors or
screen lifts) are all turned off and disconnected from the power source.
2. Mount the IPL T CR48 unit (see Mounting the IPL T CR48).
3. Attach the cables (see Connecting the Hardware in the “Connection and
Configuration” section.
4. Connect power cords and turn on the devices in the following order: output devices
(projector lifts, screen lifts, lighting system, and so on), IPL T CR48, serial controller or
computer (PC), then input devices (DSS, cable boxes, and so on).
5. Configure the IPL T CR48 through Telnet, then access the unit using an Internet browser.
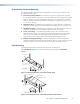
Mounting the IPL T CR48
Optional rack shelves and an assortment of mounting kits (furniture and projector mount)
are available for use with the IPL T CR48 controller. See the Specifications and Part
Numbers section for the part numbers of these accessories. Read the instructions provided
with the rack shelf or mounting kit for installation procedures.
The IPL T CR48 includes rubber feet so that it can be set on a table. If you are going to
mount the unit to a rack shelf, furniture, or pole, and these feet were attached to the
controller, remove the feet before mounting.
IPL T CR48 • Installation and Operation 3