User’s Manual HSA 822 ® Hideaway Surface Access Enclosure 68-617-02 Rev. G 08 08 © 2008 Extron Electronics. All rights reserved.
Precautions Safety Instructions • English This symbol is intended to alert the user of important operating and maintenance (servicing) instructions in the literature provided with the equipment. This symbol is intended to alert the user of the presence of uninsulated dangerous voltage within the product's enclosure that may present a risk of electric shock. Caution Read Instructions • Read and understand all safety and operating instructions before using the equipment.
Table of Contents Chapter 1 • Introduction .......................................................... 1-1 About the HSA 822 Hideaway® Enclosure ................. 1-2 Features ...................................................................................... 1-4 Chapter 2 • Installation ............................................................. 2-1 Installation Overview .......................................................... 2-2 Preparing the Routing Template ...................................
Table of Contents, cont’d HSA 822 Hideaway® Enclosure 1 Chapter One Introduction About the HSA 822 Hideaway® Enclosures Features All trademarks mentioned in this manual are the properties of their respective owners. 68-617-02 Rev.
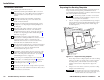
Introduction About the HSA 822 Hideaway® Enclosure The Extron HSA 822 is a furniture-mounted, architectural solution for inconspicuous computer video interface connector access and control. The HSA 822 provides space for four double space (doubleheight) or eight single space Extron Architectural Adapter Plates (AAPs), two standard grounded AC power receptacles, and four RJ-45 (Category 6, CAT 6) connectors (figure 1-1).
Introduction, cont’d The HSA 822 is available in a variety of surface finishes, including black anodized aluminum, brushed aluminum, brushed brass, and polished aluminum.
Installation Installation Overview Preparing the Routing Template Install and set up the HSA 822 as follows: 1 2 4 Cut a hole in the surface where the enclosure will be installed and install the enclosure. The clamshell, a clamping and protective device, clamps the enclosure to the table. See “Preparing the Table and Mounting the Enclosure” on page 2-4. 5 Run all cables necessary to support the AC and RJ-45 connectors and all planned AAP connectors.
Installation, cont’d Preparing the Table and Mounting the Enclosure The preferred and recommended method for preparing the table is to use the appropriate Extron metal routing template and a router. Alternatively, you can use a paper cut-out template (see appendix A, “Reference Information”) and a sabre saw or keyhole saw, but this method is not recommended. Prepare the table as follows: CAUTION The opening in the table for the HSA 822 should be cut only by licensed and bonded craftspeople.
Installation, cont’d 6. Remove the plastic strips that protect the flanged edges of the top of the surface enclosure. If a sticky residue remains, remove it with an appropriate metal cleaning product. INP SE UT LE CT CAUTION Do not use isopropyl alcohol or other solvents to clean the HSA. Strong solvents will ruin some finishes. 7. Carefully lower the HSA enclosure into the hole to test the fit. If necessary, remove the enclosure and use a file or rasp to enlarge or smooth the edges of the opening. 8.
Installation, cont’d Cabling and Installing the AAPs Remove two screws ea. side. The space behind the AAP panel is limited. The online Connectivity Configurator, available at www.extron.com, offers guidance as to the fit of AAPs into this space. Extron’s various single space and double space AAP devices, including the various RGB 580xi AAPs, can be mounted to the HSA 822. See appendix A, “Reference Information”, for RGB 580xi AAP part numbers.
Installation, cont’d Cabling the Enclosure an appropriate telecommunications or data network or to an Extron TP product. Bottom panel features An RJ-11 (telephone) plug can be connected to the RJ-45 jack. 3 When cabling the AAP panels and the bottom panel, the bottom RJ-45 connectors match up with the AAP panel RJ-45 connectors as shown in figure 2-7. For example, match the AAP panel RJ-45 connector A1 with the underside RJ-45 connector A1, match A2 with A2, and so forth.
Installation, cont’d Routing the AAP Cables Bezels The AAP cables must have freedom of movement to permit opening and closing the surface mount enclosure. At the same time, they need to be restrained to prevent their rubbing against the edges of the enclosure cable access hole in the underside of the surface mount enclosure. Rubbing against the cable access hole edges can damage the cables. Route and secure the AAP cables as follows: 1. Open the top panel to extend the AAP cables to their maximum pull.
Installation, cont’d HSA 822 Hideaway® Enclosure 3 Chapter Three Maintenance and Modifications Replacing an AAP Replacing the Bezels Removing and Replacing the Enclosure Replacing the Gas Lift Adjusting the Top Surface 2-14 HSA 822 Hideaway® Enclosure • Installation
Maintenance and Modifications The HSA 822 surface mount enclosures can be modified in the future to replace an AAP. The most probable corrective maintenance procedures required are leveling the top surface and replacing the gas lift. Most of the maintenance procedures require removing the surface mount enclosure from the table. 3. Disconnect any cables from the rear of the AAPs that are being replaced.
Maintenance and Modifications, cont’d Replacing the Bezels The HSA 822 ships with RJ-45 connector bezel plug-ins in a variety of colors and a black, blank bezel. Replace a bezel as follows: 1. Remove the top and bottom screws on the right and left sides of the AAP panel (figure 3-1). Retain the screws. Lift the panel away from the enclosure as far as the connected cables allow and then allow the panel to dangle, supported by its connected cables.
Maintenance and Modifications, cont’d The flanged edges of the top of the surface enclosure are sharp when the HSA is removed from the table. Exercise caution when handling to prevent personal injury. CAUTION The flanged edges of the top of the surface enclosure are bevelled to an ultra-fine thickness of less than 0.04 (4/100)" (approximately 1 mm). These edges are soft and can be easily nicked or bent. Exercise caution when handling and mounting the enclosure.
Maintenance and Modifications, cont’d 14. Replace the AAP panels in the surface mount enclosure and secure them in place with the screws removed in step 3. If you lose an AAP panel screw, four spare screws are stored in the underside of the enclosure. 15. Secure the two shroud halves to the enclosure frame with the eight screws per shroud half (four per side) removed in step 9.
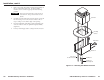
Maintenance and Modifications, cont’d CAUTION Top Panel Bracket Frame Clevis Nut 5. Turn the enclosure frame rightside-up. 6. Remove and retain the 9/32" nut and bolt that secure the gas lift to the top panel clevis. Lift the top panel and clevis off of the gas lift and set it aside on the bracket flanges. 7. Turn the gas lift counterclockwise until the lift comes free of the frame clevis nut at the bottom of the enclosure frame.
Maintenance and Modifications, cont’d Adjusting the Top Surface The top lifting panel of the HSA 822 can be adjusted to raise or lower its level flush with the flange. It can also be adjusted to ensure that the lifting panel is horizontal and not tipped. Adjusting the height of the top surface You may be able to adjust the height of the top lifting panel without removing the HSA 822 from the table.
Maintenance and Modifications, cont’d Adjusting the top surface level The top lifting panel of the HSA 822 can be adjusted to ensure that the lifting panel is horizontal and not tipped. Level the lifting panel of the HSA 822 as follows: 1. Remove the surface mount enclosure from the table. See “Removing and Replacing the Enclosure”, steps 1 through 9. Place the enclosure on a horizontal surface. To protect the finish, place the enclosure on a soft cloth. 2. If necessary, close and latch the top panel.
Reference Information Specifications General The Universal AC outlet is fully compatible with Europlug, British, Indian, Danish, and Italian plug types. See the Universal AC outlet guide on the Extron Web site, www.extron.com, for compatibility details on all plug types Rack mount .................... No, but furniture mountable Enclosure type ...............
Reference Information, cont’d Included Parts Top Plate Dimensions Part The preferred and recommended method for cutting the table is to use the metal routing template (figure A-2 and chapter 2, “Installation”) and a router. The template, part # 70-191-01, is available at no cost.
Reference Information, cont’d Cut-Out Template for Extron's HSA 822 Hideaway® Enclosure HSA 822 User Access (Connectors and AAP Openings) 8.470" (21.51 cm) 6.220" (15.80 cm) B 7.900 + 0.0325" (20.07 + 0.083 cm) 8.750" (22.23 cm) 6.500" (16.51 cm) SURFACE CUT-OUT AREA = 7.900 + 0.0325" (20.07 + 0.083 cm) x 8.250 + 0.0325" (20.96 + 0.083 cm) Appendix B 8.250 + 0.0325" (20.96 + 0.083 cm) 0.5" (1.3 cm) Cut surface material out along this line. Tilting Plate Top Panel Cut-Out Radius: 0.25" (0.
Packaging for Shipment The HSA 822’s ultra-fine machined surfaces and moving parts make them vulnerable to damage caused by mishandling during shipment if they are improperly packaged. If, for any reason, you need to return an HSA to Extron, first contact Extron to obtain a return kit. The return kit, which reduces the chances of damage during shipment, includes a sturdy shipping carton and foam cut to fit the HSA (figure B-1). 2.
Packaging for Shipment, Cont’d 4. Place the enclosure and clamshell rightside-up on a horizontal surface. To protect the finish, place the enclosure on a soft cloth or rubber mat. 5. Install the rubber strips that protect the flanged edges of the top of the surface enclosure (figure B-3). 7. Insert the HSA 822 and the clamshell into one of the foam shells (figure B-4). Either open end of the clamshell and the open top panel will fit into the recesses in the foam.
Packaging for Shipment, Cont’d 9. Lower the foam-protected HSA into the shipping carton (figure B-6). Figure B-6 — Placing the HSA in the shipping carton B-6 10. Close the shipping carton and seal it with high quality shipping tape. 11. Ship the HSA to Extron using a reputable shipping company.
Packaging for Shipment, Cont’d B-8 HSA 822 Hideaway® Enclosure • Packaging for Shipment