
- Extron Electronics User's Manual switch


Relay Control Modules • Installation and Operation
Relay Control Modules • Installation and Operation
Installation and Operation, cont’d
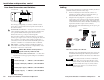
Setting Up the Buttons
Before the control module’s buttons can control the MLC’s
relays, you must set up the MLC for each of the RCM’s buttons.
Refer to the MediaLink Control Program for specific details.
1. Cable and supply power to the MLC, the control
module(s), and a host computer.
2. Start the Windows-based MediaLink Control Program.
3. In the Controller (MLC) Configuration section of the
program, select (click on) the control module button that
you wish to set up, and select (click on) the box
corresponding to the relay you want to tie to that button.
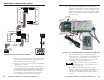
POWER
DELAY
OUT
+12VDC
6Ma MAX
GND
REMSTATUS
LISTED
7Z37
PROFESSIONAL
AUDIO EQUIPMENT
C
120 VAC 50/60 Hz
MAX LOAD 15 A
MINIPORT-15
POWER RELAY
CLASS2 WIRING
3A
3B
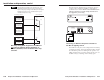
MLC Relay Port
Connecting a Furman MiniPort-15 AC power
controller to the MLC for lighting control
For the Furman controller, connect pins 3A and 3B of the
MLC’s relay port to the 12VDC and REM poles. The relay
should be set for latching connection, and the MLC
contacts should be set to “normally open”.
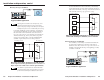
7. Use the MediaLink Control Software to set up the modules
and the relays. See “Setting Up the Buttons” in this
chapter for details.
Assign the appropriate relay to each RCM button in the
Controller (MLC) Config section of the software. In the
Relay & Misc. Options section of the software, set all the
relays to NO (normally open). Also set the relays used for
screen control to momentary contact, and set relays used for
lighting control to latching contact.
Front Panel Features and Operation
ROOM CONTROL
SCREEN POSITION LIGHTING
ON / OFF
SCREEN POSITION
DOWN UPSTOP
2 1
311
RCM-SC
Front
RCM-SCLT
Front
1
Screen Position Up ( )/Down ( ) buttons — These buttons can
be set up (via the control software) to toggle the screen to move
up or down.
2
Screen Position Stop button — Press this button to stop the
up/down motion of the screen.
3
Lighting On/Off button — This button acts like a light switch,
toggling the room lights on or off when pressed. This button
must also be set up via the control software before it can control
the lights.
2-12 2-13