Installation Guide SPA 12 AAP Architectual Speaker www.extron.com Extron Electronics, USA Extron Electronics, Europe Extron Electronics, Asia Extron Electronics, Japan 1230 South Lewis Street Anaheim, CA 92805 USA 714.491.1500 Fax 714.491.1517 Beeldschermweg 6C 3821 AH Amersfoort The Netherlands +31.33.453.4040 Fax +31.33.453.4050 135 Joo Seng Road, #04-01 PM Industrial Building Singapore 368363 +65.6383.4400 Fax +65.6383.4664 Kyodo Building 16 Ichibancho Chiyoda-ku, Tokyo 102-0082 Japan +81.3.
Precautions Safety Instructions • English This symbol is intended to alert the user of important operating and maintenance (servicing) instructions in the literature provided with the equipment. This symbol is intended to alert the user of the presence of uninsulated dangerous voltage within the product's enclosure that may present a risk of electric shock. Caution Read Instructions • Read and understand all safety and operating instructions before using the equipment.
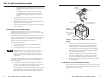
Introduction The Extron SPA 12 AAP is a full-range speaker designed for installation within the enclosures of select HSA (Hideaway™ Surface Access) and Cable Cubby® Series products. It provides localized, near-field sound coverage for one or more participants at a conference table. Mounting the SPA 12 AAP The SPA 12 installs directly into the four-space AAP opening of various architectural frames; the Cable Cubby 300, 600, and 800 series; and the HSA 400, and 822 series.
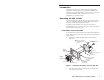
SPA 12 AAP Installation Guide 3. From the left side (viewed from the back) of the four-space AAP opening in the HSA 400 front panel, remove the L-bracket and mounting nuts. 4. Insert the SPA 12 speaker and front grill into the four-space opening of the HSA 400. 5. Attach and tighten #4-40 nuts to the furthermost left (viewed from the back) pair of threaded standoffs of the SPA 12. This should seal the SPA 12 speaker onto the HSA 400 front plate. 6.
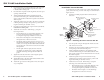
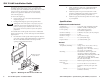
SPA 12 AAP Installation Guide 8. Tighten #4-40 nuts to the SPA 12 threaded standoffs on the right side (viewed from the back). 9. Each SPA 12 AAP includes a rear enclosure and a factory installed magnet cap to secure it. These pieces enhance the quality of sound, but are not required for use. Some Cable Cubby and HSA mounting options are too small to allow for these optional pieces, and some wall mount situations may present an obstruction.
SPA 12 AAP Installation Guide The magnet cap and rear enclosure pieces work best with mounting options where ample room is provided for them. Some four-space AAP architectural frame products are too small to allow for these optional pieces, and some wall mount situations may present an obstruction. In such instances, remove the magnet cap. To remove the magnet cap 1. Unscrew the two ¼” lock washer nuts that hold the magnet cap in place. 2. Gently pull the magnet cap from the speaker driver.
Specifications, Part Numbers, Accessories Product weight ............................. 0.7 lbs (0.3 kg) Shipping weight ........................... 3 lbs (2 kg) Warranty ....................................... 5 years parts and labor All nominal levels are at ±10%. Specifications are subject to change without notice.