
Instruction Manual

PRELIMINARY
1
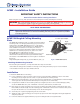
ACMP 100 Angled Ceiling Mounting
Plate
The ACMP 100, available in black, is a simple and easily installed
mounting solution for hanging and leveling a projector from an
angled ceiling. The ACMP 100 adjusts from -5 to +95 degrees,
can support a projector setup weighing up to 200 lbs (91.6 kg),
and is suitable for installation on wooden joists. It has an
integral 1½" National Pipe Thread pipe adapter, allowing the
attachment of a suitable projector pole, such as one of the
Extron PMP (Projector Mounting Pole) series.
The ACMP 100 is a complementary mounting accessory for use
with the Extron UPB 25 (Universal Projector Mount Bracket).
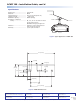
The features of the ACMP 100 are shown in figure 1. Included in
the kit are:
Angled Ceiling Mounting Plate, (1), and Hex Wrench, 3/32", (1).
Checking the Mounting Location
Before starting the installation, it is important that these steps are followed:
• Check that the ceiling plate is suitable for the angle of the ceiling where the projector is to be installed.
• The installation must be done by a skilled technician
ACMP • Installation Guide
IMPORTANT SAFETY INSTRUCTIONS
Read all instructions before starting installation.
When using this accessory, basic precautions should always be followed, including the following:
WARNING: Risk of Personal Injury. Maximum setup load for the ACMP 100 is 200 lbs (91.6 kg). The structural
ceiling must be capable of supporting 4 times the weight of the final setup.
SAVE THESE INSTRUCTIONS
NOTE: Refer to local building standards and codes to verify that the installation will meet the regulatory
requirements. Observe all local and national building and safety codes, UL requirements, and ADA
accessibility guidelines.
Figure 1. ACMP 100 Features
Installation
To install the ACMP 100 on a flat ceiling
1. Locate a suitable wooden joist at the location chosen for the installation. Mark the position of the three
mounting holes (see figure 1) in the center of a joist (minimum size 2 inch by 4 inch).
2. Drill pilot holes perpendicular to the joist. The pilot holes should be 70% of shank diameter and the full depth
of the lag bolts to be used (1/4 inch diameter by 4 inch lag bolts are recommended).
3. Using fasteners suitable for the mounting surface (not supplied, see above for recommended type), firmly
secure the ACMP 100 to the joists. A minimum of two bolts, with washers, should be used.
4. Back out the set screws, and then screw a projector mounting pole (with an NPT 1.5 inch thread, such as an
Extron PMP) of suitable length into the mounting plate. A minimum of three turns is needed to safely secure
the pole. Be careful not to cross thread the pole into the mounting plate.
5. Secure the pole in position by tightening the set screws down.
6. Adjust the angle of the mounting pole to keep the projector horizontal. Fully tighten the angle adjustment
and pivot point bolts.
7. Follow the instructions supplied with the projector mounting bracket to hang the bracket.
Mounting Holes (3)
Set Screw
Pivot Point Bolt
(3/4")
Angle
Adjustment
Bolt (9/16")
1½" NPT Pipe Adapter