
User Guide Manual


To set an additional ducking source:
1. Insert a ducking processor on the additional ducking source.
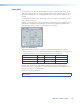
In this example, input #2 is the second ducking source, with input#1, as shown
above, as the first source.
NOTE: Since it was previously selected as a
ducking target, Input#1 is not available as a
target of input #2.
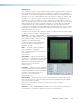
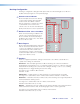
2. Open the ducking dialog window for the input and
select the desired duck targets. In this example
inputs #5 and #6 are the ducking targets of input
#2.
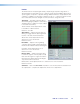
Any signal on input #2 that exceeds the ducking
threshold now ducks inputs #5 and #6. The
ducking targets can be changed at any time by
double-clicking the input #2 ducking processor
block.
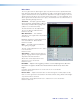
If a signal on input #1 exceeds the ducking
threshold, inputs #2 to #6 are still ducked regardless
of whether the signal on input #2 exceeds its ducking threshold.
NOTE: No input is ducked more than the level set in the by (dB): box.
Ducker Tutorials
The examples below are based on different input configurations. Insert a ducker from a
ducker processor block using one of the following methods:
Double-click the block,
then click Ducker
Right-click the box to open context
menu, then click Insert Ducker
-or-
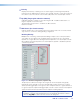
Once inserted, double-click on the ducker block to open the ducker configuration dialog
box. The Enable Mic/Line Source box is checked.
Ducking and Priority Ducking
The first inserted channel ducks all selected targets.
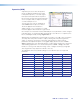
To set a ducking source:
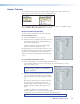
1. Insert a ducking processor to input #1.
2. Open the ducker configuration box and select the
desired duck targets. In this example inputs #2 to
#6 are the ducking targets.
A signal on input #1 that exceeds the ducking
threshold now ducks inputs#2 to #6.
The ducking processor also provides a means to have
an additional input duck other targets using the priority
feature. The second input ducks its selected duck
targets, and can also be ducked by the first ducking
source.
DMP64 • Software Control 54