
User`s manual
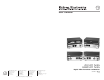

DVI 201 and HDMI 201 Tx/Rx • Installation
Installation
DVI 201 and HDMI 201 Tx/Rx • Installation
2-2 2-3
Mounting the Tx/Rx
C
Installation and service must be performed by
authorized personnel only.
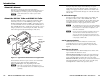
The 1" high, quarter-rack width transmitters and receivers can
be placed on a tabletop, mounted on a rack shelf, mounted
under a desk or tabletop, or mounted on a projector bracket.
Tabletop placement
Affi x the four included rubber feet to the bottom of the
transmitter or receiver unit and place it in any convenient
location.
Rack mounting
For optional rack mounting, mount the transmitter or receiver
on any of the following rack shelves:
• RSF 123 3" deep VersaTools
®
rack shelf kit (part #60-190-
20) (fi gure 2-1)
• RSB 123 3" deep VersaTools rack shelf (part #60-604-20)
• RSU 126 6" deep universal rack shelf kit (part #60-190-10)
• RSB 126 6" deep basic rack shelf (part #60-604-10)
• RSU 129 9" deep 1U universal rack shelf kit
(part #60-190-01) (fi gure 2-2)
• RSB 129 9" deep 1U basic rack shelf (part #60-604-01)
On the non-VersaTools rack shelves, the transmitter or receiver
unit can be mounted in the front or the rear of the rack.
1. Remove the feet from the bottom of the transmitter or
receiver unit, if they are installed.
2. Mount the transmitter or receiver unit using two
4-40 x 3/16" screws in opposite (diagonal) corners to
secure the transmitter or receiver to the shelf.
3. Install false faceplate(s) or other unit(s) to the rack shelf.
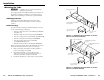
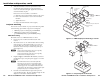
(2) 4-40 x 3/16"
Screws
Use 2 mounting holes on
opposite corners.
VersaTools Rack Shelf
1/4 Rack Width Front
False Faceplate
Figure 2-1 — Mounting the transmitter or receiver
unit on a VersaTools rack shelf
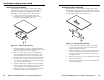
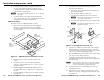
Use 2 mounting holes on
opposite corners.
(2) 4-40 x 3/16"
Screws
1U Universal Rack Shelf
Both front false faceplates
use 2 screws.
1/4 Rack Width Front False
Faceplate
1/2 Rack Width Front False
Faceplate
Figure 2-2 — Mounting the transmitter or receiver
unit on a standard rack shelf