
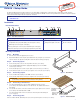
Setup Guide User guide

2
IN1606 • Setup Guide (Continued)
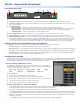
Front Panel Overview
VOLUME
SCALING PRESENTATION SWITCHER
IN1606
INPUTS
65431 2
HDCP
SIGNAL
BA
OUTPUTS
ENTER
MENU
CONFIG
213
4
56
INPUTS
a b c de f
Figure 4. Front Panel Features
a
Front panel config port — Connect a host device to the mini USB B port for device conguration, control, and rmware upgrades.
b
Input selection buttons (1-6) — Press one of these buttons to select an input. The buttons light amber for audio and video, green for video
only, or red for audio only.
c
Status LED indicators —
Input Signal LEDs — Light for the corresponding input when active video content is detected on that input.
Output Signal LEDs — Remain lit green when active video is being output, or blink amber when output video and sync are disabled.
Input HDCP LEDs — Light for each input signal that is HDCP-encrypted. Analog inputs 1 and 2 cannot be HDCP-encrypted.
Output HDCP LEDs — Light for an output when it is currently HDCP-encrypted.
d
Menu and Enter buttons — Press these buttons to access and navigate the on-screen display (OSD) menu system.
e
Navigation buttons — Press these buttons to navigate through the on-screen display menu system or change selected settings.
f
Volume knob and LED indicators — Rotate the Volume knob to adjust the variable analog audio output (default), mic, or program volume
(see the IN1606 and IN1608 Series User Guide to congure the knob through group masters). The eight Volume LED indicators light in order
according to the audio volume level. The bottom LED blinks when the volume is muted. They light in order from bottom to top to indicate a
12.5% increase or decrease in volume (12.5 dB) from 1% (-99 dB) to 99% (-1 dB). The top LED blinks when the volume is 100% (0 dB).
Setting Front Panel Lockout Modes (Executive Modes)
The IN1606 has two modes of front panel security lock that limit the operation of the device from the front panel.
• Executive mode 0 — The front panel is fully unlocked. This is the default setting.
• Executive mode 1 — The front panel is completely locked. This can only be enabled or disabled using SIS commands or the internal
web pages (see the IN1606 and IN1608 Series User Guide for web page details or the rear page of this guide for the SIS command).
• Executive mode 2 — The front panel is locked except for input switching and volume control. Press and hold the Menu and Enter
buttons simultaneously for 3 seconds to enable or disable this mode.
Conguring the IN1606
The IN1606 can be congured through front panel controls and the OSD menu, the internal web pages, the Extron Product Conguration Software,
or SIS commands. To access the internal web pages or send SIS commands, connect a host device to the IN1606 via RS-232, USB, or Ethernet
connection (the internal web pages can only be accessed through an Ethernet connection).
On-Screen Display (OSD) Menu System
The IN1606 has an OSD menu consisting of nine submenus that can be accessed using the
front panel Menu or Enter button. View the menu on a display connected to either HDMI output
connector (see f on page 1). The submenus are:
Quick Setup User Presets Picture Controls Input Output
Audio Advanced Communication Device Into
To use any submenu:
1. Press the Menu or Enter button to access the main menu.
2. Press the Up or Down arrow button to navigate to the desired submenu.
3. Press the Enter or Right arrow button to access submenu items for the selected submenu.
4. Press the Up or Down arrow button to navigate submenu items.
5. Press the Enter or Right arrow button to adjust a submenu item.
Using the OSD menu to congure the IN1606
• Use the Quick Setup submenu to perform an Auto-Image™ the current input, set video input format, input EDID settings, set output
resolution, mute audio, activate video test patterns, enable or disable DHCP, and set the IP address.
• Use the User Preset submenu to save picture control settings to each input for later manual recall.
• Use the Picture Controls submenu to adjust the image position and size, brightness and contrast, color and tint, and detail as needed.
• Use the Input submenu to perform an Auto-Image on the current input, set the video input format and lm mode, set horizontal and vertical
start values, set the number of active horizontal pixels and vertical lines, set the total pixels and phase, set HDCP authorization, and set the
EDID for the current input.
• Use the Output submenu to set output resolution, HDMI output format for each output, and HDCP notication.