User Guide AV Streaming Products JPEG 2000 Encoder (J2KENC and J2KENC-PRO) JPEG 2000 Encoder Software 68-1982-01 Rev.
Conventions Used in this Guide In this user guide, the following are used: NOTE: A note draws attention to important information. TIP: A tip provides a suggestion to make setting up or working with the software easier. Selectable items, such as menu names, menu options, buttons, tabs, and field names are written in the font shown here: From the File menu, select New. Click the OK button. Copyright © 2012 Extron Electronics. All rights reserved.
Contents Introduction and Installation................................ 1 About this Guide.............................................. 1 About the JPEG 2000 Encoder.......................... 1 Features........................................................ 2 System Requirements........................................ 3 Software Installation......................................... 4 Licensing and Activating the Full Version....... 6 Encoding Procedure...............................................
JPEG 2000 Encoder • Contents iv
Introduction and Installation This section gives an overview of the guide and features of the Extron JPEG 2000 Encoder software. Installation is also described. Topics that are covered include: zz About this Guide zz About the JPEG 2000 Encoder zz System Requirements zz Software Installation About this Guide This guide provides detailed information about the JPEG 2000 Encoder software, including software installation and encoding procedure.
As the time required for encoding a DCP is directly proportional to the number of image frames and the size of the associated audio files, the full version software is tailored to use all of the processing power of the encoding computer (see “System Requirements”). The application can run simultaneously on multiple computers, thereby functioning as an “encoding array” to significantly increase throughput when processing DCPs. The difference in processing speed between the two versions is considerable.
System Requirements Ensure that the system hardware to be used meets or exceeds the minimum requirements listed below. Encoding performance improves when a system more powerful than the minimum listed here is incorporated. NOTES: • The encoding computers must be network capable. • It is recommended that the application be used on a computer with superior processing capacity, speed, and memory to reduce encoding time since the process can take hours (or days), depending on the length of the video.
Software Installation The JPEG 2000 Encoder application requires Microsoft .NET Framework 3.5 SP1 in order to function. Ensure that your encoding computer is equipped with this version of .NET Framework before installing the JPEG 2000 Software Encoder. To verify or install .NET Framework: 1. Verify the presence (or absence) of Microsoft .NET Framework 3.5 SP1. If using Windows XP: From the desktop, navigate to Start > Control Panel > Add or Remove Programs and verify the presence (or absence) of Microsoft .
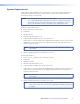
To install the JPEG 2000 Encoder: Steps 3 and 4 are shown in figure 1. 1. Load the JPEG 2000 Encoder installation file on your encoding computer. 2. On-screen instructions appear, starting the installation setup of the JPEG 2000 Encoder. Click Next. 3. On the Select Installation Folder screen, click Browse to navigate to a different folder in which to install the application If desired and click Disk Cost to check available disk space. Figure 1. Select Installation Folder Screen 4.
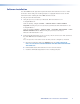
To open the JPEG 2000 Encoder: Double-click the JPEG 2000 Encoder icon on your desktop. - or From the desktop, click Start > All Programs > Extron Electronics > JPEG 2000 Encoder. The default lite version of the application opens. Figure 2. Indication of Lite or Full Version of JPEG 2000 Encoder You can use the lite version of the application immediately (without access to its full feature set) or you can choose to activate the full version of the software.
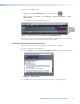
To license and activate the full version: Some of the steps are shown in figure 4. 1. Contact Extron for a full license and to generate the license and activation keys. You will receive a license key from Extron via e-mail. 2. From the Help menu, select Licensing and Activation. The Licensing and Activation screen opens. Figure 4. Licensing and Activation Screen 3. Copy and paste the license key characters into the License Key field.
Transferring a license to a different PC Follow the steps below to transfer the full license to another computer if needed. You can also use this procedure to transfer the full license back to the original computer if needed. 1. From the Help menu, select Licensing and Activation. The Licensing and Activation screen opens. Make a note of the original license key. 2. Click Transfer Code. A transfer code is generated and the original PC now has the lite version of the JPEG 2000 Encoder.
Encoding Procedure This section describes the process of encoding content for the JMP 9600. Topics that are covered include: zz Encoding Overview zz Main Menu Options zz Single Clip Encoding zz Batch Encoding zz Status Indication zz Encoding Across Multiple Computers (Remote Machines) Encoding Overview The main steps for encoding content for the JMP 9600 are as follows: 1.
File Menu From the File menu, select Exit to close the application. You can also click the upper right corner of the application window to close the JPEG 2000 Encoder. in the Tasks Menu The Encode option is used to configure the application to find source files (video and audio inputs), set encoding parameters, edit the frames, define output names, and define the output location.
Encode Settings tab Loading or saving encode settings You can save your encoding configuration settings as an EPR file that can be reused at a later time. The configuration settings that are saved include encoding settings, effect settings, and drawing settings. To save a configuration: 1. From the Tasks menu, select Encode. 2. On the Encode Settings tab, adjust the encoding settings as desired. NOTE: An output folder needs to be specified in order to save the encoding settings (see “Outputs”). 3.
5. Beside the Video Folder field, click the button to navigate to the folder (or the previously mapped drive) containing sequential image frames (BMP, DPX, PNG, TGA, or TIFF) that are to be encoded. The path for the selected folder appears in the Video Folder field. NOTES: TIPS: • When selecting and opening a folder in the Browse for Folder dialog box, the files within the folder are not displayed. • All of the image files in this folder are included in the encoding process.
To select multiple mono files: 1. Below the Audio Files field of the Inputs section, select Multiple mono files. 2. Beside the Audio Files field, click the screen. Figure 6. button to open the Audio Channels Audio Channels Screen 3. For each audio channel, click the respective button to locate the desired audio content and assign the files to the respective “surround sound” channels. 4. Click OK to accept the settings or click Cancel to exit the Audio Channels screen.
Encoding parameters Use the Encoding Parameters section of the Encode Settings tab to define the properties of the DCP. The available settings include: zz Resolution — Choose an output resolution. The drop-down list displays formats that correspond with the JMP 9600 hardware profile selected from the Options menu. zz Chroma — Choose the chroma setting. TIP: When 4:4:4 color sampling is selected, the resulting clip requires the JMP 9600 to be configured for single channel mode.
Outputs Use the Outputs section of the Encode Settings tab to define the identity of the DCP and the location where the DCP is stored after it is generated. To adjust the output settings: 1. From the Tasks menu, select Encode. 2. Select the Encode Settings tab. 3. In the Composition Name field of the Outputs section, enter a unique name for the DCP. 4. Beside the Output Folder field, click the button to navigate to the folder designated as the storage location for the final Digital Cinema Package output.
Effect Settings tab The features on the Effect Settings tab allow you to crop and scale the video for multi-screen applications or to match the native resolution of the target display device. NOTES: • The available effect options depend on the settings in the encoding parameters and the incoming frame size (see “Encode Settings tab”). • The Effect Settings tab is disabled if the resolution of the source graphics file matches the target encoder resolution. Figure 7.
Crop mode To enable crop mode: On the Effect Settings tab, click Crop Mode. If the input frame is larger than the target frame, an image appears in the output window with a light blue rectangle superimposed upon it. NOTE: If the input frame is smaller than the target frame, Crop mode is not available. The blue rectangle represents the area that will be kept after the cropping is complete. Cropping the image removes all pixels outside of the blue rectangle. The crop area can be modified as needed.
The crop size appears below the position information. The default crop size is the output resolution set on the Encode Settings tab. Cropping works only if the input image is larger than the output frame. To adjust the crop size: On the Effect Settings tab, click and drag the corners of the crop region box within the Crop Editor window to change the crop size. - or 1. Click the button beside the Crop Size field to open the Change Value screen. Figure 9. Change Value Screen 2.
To rename a crop region for easier identification: 1. On the Effect Settings tab, double-click a name in the Crop Regions section. The Crop Region Name screen opens. Figure 10. Crop Region Name Screen 2. In the New Name field, enter a name to identify the crop region. 3. Click OK to exit this screen and return to the Effect Settings tab. Stretch mode To enable stretch mode, click Stretch Mode on the Effect Settings tab.
To reposition the image: On the Effect Settings tab, click and drag the image on the screen. - or Click the Up, Down, Left, and Right buttons to nudge the image in single-pixel increments. - or 1. Click the button beside the Position field to open the Change Value screen. 2. Enter specific pixel coordinates in the New Position X and New Position Y fields. 3. Select the Save values check box if desired. 4. Click OK to exit the Change Value screen. The position information updates in real time.
Text editing To add a text block: 1. On the Drawing Settings tab, click the Enabled radio button. This activates the settings on the tab. 2. In the Text section, click the options. button and select Text from the drop-down list of 3. In the Text section, click the button to add a text block. 4. Edit the text block that appears in the upper left corner of the output display. NOTE: Move the text block into the output frame (within the red-bordered image) or it will not appear on the output screen.
3. Click Change beside the Name field of the Font Information section to change the font style. The Font screen opens. Figure 13. Font Screen NOTE: Depending on the overlay font in use, the “tails” of lowercase characters and other “flourishes” in decorative fonts may be cut off in the Preview section of the Font screen. The actual font output displays correctly. 4. On the Font screen, select the desired font family, font style, and font size. 5. Click OK to return to the TextDialog screen. 6.
7. Modify the border color: a. In the Font information section of the TextDialog screen, double-click the Border Color box to change the border (stroke) color. The Select a Color screen opens. b. Adjust the color settings as desired. c. Click OK to accept the border color parameters and return to the TextDialog screen. Alternatively, click Cancel to return to the TextDialog screen without making changes. 8. On the TextDialog Screen, click OK to return to the Drawing Settings tab.
JMP 9600 Hardware Profile The options listed on the JMP 9600 Hardware Profile submenu of the Options menu tailor the output of the encoder for particular use on the JMP 9600 player. Select a profile to define which encoding parameters are best suited to the required DCP. See the JMP 9600 User Guide for more information about the JMP 9600. To select the JMP 9600 hardware profile: From the Options menu, locate the JMP 9600 Hardware Profile submenu and select one of the listed options: zz V. 2.
More Options More Options on the Options menu controls certain basic parameters of the JPEG 2000 Encoder. To adjust the settings listed under this option: 1. From the Options menu, select More Options. The JPEG 2000 Encoder Options screen opens: Figure 16. JPEG 2000 Encoder Options Screen 2. Select or clear the settings as needed. Available options include: zz Start application minimized.
About To view information about the software, including the version that is in use, select About from the Help menu. Single Clip Encoding Before you start to encode a single DCP or clip, ensure that the relevant settings of the JPEG 2000 Encoder are correct. Figure 17.
To encode a single DCP or clip: 1. Right-click an encoding task listed in the Composition column of the JPEG 2000 Encoder main screen and select Start from the drop-down menu. The available options on the drop-down menu include: zz Start — Starts the encoding process for this item only zz Stop — Pauses the encoding process for this item only. If there is a single DCP listed in the Composition column, you can also click Stop All. zz Edit — Opens the Encode Settings tab (see “Encode Settings tab”).
Encoding Across Multiple Computers (Remote Machines) You can incorporate a number of computers on a network into an encoding array to greatly expand the throughput of the encoding system. The time required to encode the quantity of data is reduced. This is significant as JPEG 2000 files can be very large (terabytes). NOTE: The same (fully licensed) version of the JPEG 2000 Encoder software must be installed on each computer that makes up the array.
3. Click OK to return to the main screen or click Cancel to return to the main screen without adding a machine. The computer IP address or name appears in the Remote Machines section of the main screen. The following states can appear beside each listed remote machine: zz Ready — Indicates that the computer is available for encoding tasks zz Unavailable — Indicates that the computer is not connected.
Reference This section provides reference information regarding the encoding and packaging processes when creating content for the JMP 9600 JPEG 2000 Media Player. Topics that are covered include: zz Encoding and Packaging Overview zz Encoding Related Specifications zz Part Numbers Encoding and Packaging Overview Creating content for the JMP 9600 using the JPEG 2000 Encoder is accomplished in three stages: encoding, wrapping, and packaging, as shown in figure 19.
Audio Track Files An audio track file is the smallest unit of audio in the system. It is an MXF container that has all of the PCM-encoded, compressed audio data and associated meta-information necessary to recreate a piece of audio (for example, see the a.mxf file shown in figure 19). The JMP 9600 supports frame-wrapped audio track files that conform to SMPTE 377M-2004 and SMPTE 382M-2007 standards.
Part Numbers These items are the available software versions and JMP 9600 models. The JPEG 2000 Encoder software included with the JMP 9600 supports content preparation for one unit; two-channels of audio per video clip and single processor encoding only.
Extron Headquarters +1.800.633.9876 (Inside USA/Canada Only) Extron USA - West Extron USA - East +1.714.491.1500 +1.919.863.1794 +1.714.491.1517 FAX +1.919.863.1797 FAX Extron Europe +800.3987.6673 (Inside Europe Only) +31.33.453.4040 +31.33.453.4050 FAX Extron Asia +800.7339.8766 (Inside Asia Only) +65.6383.4400 +65.6383.4664 FAX Extron Japan +81.3.3511.7655 +81.3.3511.7656 FAX Extron China +4000.398766 (Inside China Only) +86.21.3760.1568 +86.21.3760.1566 FAX Extron Middle East +971.4.2991800 +971.4.