
User guide


SMX System MultiMatrix Switcher • Operation 25
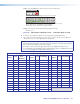
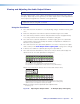
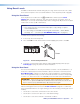
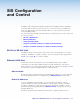
Step 4.
Press and release the output button to be delayed (here output 8). Input
buttons light to show the current RGB delay (here 2.5 seconds).
ENTER
C O N T R O L
PRESET
ESCVIEW
ENTER
Step 3.
Press and hold the View button until the plane button ashes green.
C O N T R O L
PRESET
ESCVIEW
INPUTS
1
2
3
4
5
6 7 8
9
10
11 12
13 14 15 16
OUTPUTS
1
2
3
4
5
6 7
8
9
10
11 12 13 14 15 16
Step 5. Press View to decrease or Esc to increase the delay.
The maximum RGB delay is 5 seconds.
Step 2.
Press and release a VGA or RGBHV plane button (lights green or amber).
I/O PLANE SELECT
1
2
3
4
5
6 7 8
9
10
11 12 13 14 15
0
I/O PLANE SELECT
1
2
3
4
5
6 7 8
9
10
11 12 13 14 15
0
Figure 22. Setting RGB Delay — an Example (Steps 2 through 5)
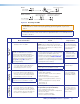
6. Press and release the Enter button to save the settings and exit the RGB delay mode.
Setting the Front Panel Locks (Executive Modes)
The SMX has three levels of front panel security lock that limit the operation of the switcher
from the front panel. The three levels are:
• Lock mode 0 — The front panel is completely unlocked, and all front panel controls are
available. Basic and advanced features are available.
• Lock mode 1 — All changes are locked from the front panel (except for setting Lock
mode 2). Only View mode is available.
• Lock mode 2 — Basic functions are unlocked. Advanced features are locked and can
be viewed only (default mode).
Basic features consist of:
• Making ties
• Saving and recalling presets
• Setting input audio gain and attenuation
• Changing lock modes
Advanced features consist of:
• Setting video and audio output mutes
• Setting audio output volume
• Setting RGB delay (VGA, RGBHV boards)
• Setting the rear panel report port protocol and baud rate
NOTE: The SMX is shipped from the factory in lock mode 2 (see SIS Configuration
and Control on page 34 to set lock modes using SIS commands).