
User Guide Instruction Manual

Suspended Ceiling Installation
Remove the ceiling tile where the speaker is to be installed.
Painting the Speaker Baffle
Cut along the smaller perforated line of the cutout
template, marked as paint shield. Push it into the front
baffle of the speaker. Paint the front. Remove the paint
shield after the paint has dried.
Loosen the four screws on the front baffle (counter
clockwise) 1/2 turn. Then tighten the screws (clockwise)
until the dog legs clamp the speaker to the ceiling.
1
Cut the hole in the tile. See step 1 of the Frame Construction
Ceiling Installation section on the back.
2
8
Apply 4 pieces of black putty (supplied), equally spaced 90°
apart, to the upper inside edge of the grille (see step 5 on
the back).
Install the speaker grille.
5
Connect the wires to the speaker terminal clips (see step 2
on the back).
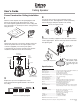
Application diagram
Packaging
3
Bring the speaker cable through the hole of the cut tile,
then reinstall the tile.
4
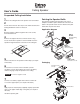
Remove the adjacent tile. Place 2 V-rails and 1 C-ring
across the tile where speaker is to be installed. Insert the
speaker through the bottom of the hole in the ceiling tile.
6
Do not over-tighten screws!
CAUTION
V-rail
C-ring
7
Connect a secondary support line from the seismic tab
to a secure support point (see step 5 on the back).
SI 26CT
Ceiling Speaker
User’s Guide
POWER
12V
3A MAX
OUTPUTS
4/8 Ohms
INPUTS
70V
COM 70V
REMOTE
(MONO)
(MONO)
L
R
10V
LISTED
1T23
I.T.E.
VOL/MUTE
L
MPA 181T
R
C
US
PC
Projector
DVD/VCR Combo
VGA w/
Audio Cable
Composite
Audio RCA
Variable
Extron
VCM 100 AAP
Volume/Mute Controller
Extron
MPA 181T
Mini Power Amplifier
Extron
SI 26CT
Two-way Ceiling
Speakers
VOLUME
VCM 100
MUTE
V-rails (4)
Mounting Screws
& Putty
C-rings
Speakers
Speaker Grilles