
Setup guide


3
TLP 350CV Cable Cubby • Setup Guide
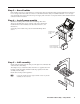
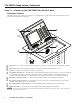
Step 3 — Run all cables
Run all cables necessary to support the AC connector, the cables stored in the cubby, and all planned AAP connectors.
Leave enough slack in the cables to connect or route them before the cubby is installed in the table. Leave enough
space under the enclosure for the external power supply and connection of computer and AV cables and the network
connection of the TLP 350CV.
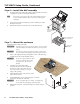
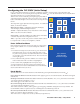
Step 4 — Install power module
Install the included power module before installing other AAPs.
The power module takes up two or three AAP spaces and must be
installed in the location furthest to the left of the enclosure. (See
illustration.)
Secure the power module into position with #4-40 Phillips head
screws.
Install the power
module on the
left side.
Push module through
bottom of enclosure.
Secure in place with screws.
COMPUTER
AUDIO
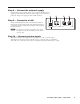
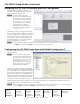
Step 5 — AAP assembly
Install all desired cables into the cable pass-through AAPs and install the
AAPs into the Cable Cubby.
The simplest way to install the cables and AAPs is to populate the AAP
brackets outside the cubby and then install the populated AAP shelf
assembly into the cubby.
Install cables in the pass-through holes:
T
Leaving the #4-40 nuts finger tight will make it easier to place the
assembly into the enclosure.