
Setup guide


7
TLP 350CV Cable Cubby • Setup Guide
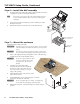
Configuring the TLP 350CV (Initial Setup)
Prior to using the TLP 350CV, it is essential to configure it, using the on-screen menus. The setup menu and
calibration screen are accessed using the front panel menu button (
e
). Press the menu button once to enter the Main
setup menu and twice to access the calibration screen.
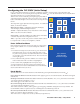
Main
Vol
Time
IP Exit
Down Up
Down
OnOn
Up
Sleep timer: 50000 Sec
Backlight: 073%
Auto
Backlight
Vid
LED
Backlight
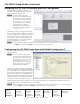
+
+ +
+
Press and Hold
Highlighted Box
Until Color Changes
Enter Calibration Menu
If the touchscreen panel does not react properly to a finger touch,
it may require calibration. To access the touchpanel calibration
screen:
1. From the main setup screen (shown above), press the recessed
menu button (
e
) once to access the calibration menu. From
any other screen, press the recessed menu button twice (within
one second) to access the calibration menu. The screen shown
on the right appears.
2. Press and hold on the green box until the color reverts to grey
with a white border and a second box is highlighted.
3. Move to the newly highlighted box and repeat step 2.
4. Repeat until all four boxes have been pressed and are gray.
Once all four boxes have been calibrated the screen automatically
returns to the Main menu (see above).
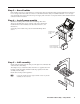
Reset Modes
The TLP 350CV has four reset modes that can be initiated by pressing the Reset button (Front Panel (
f
)):
Factory Firmware Mode: Hold the Reset button while applying power to reset the unit back to the firmware shipped
with the unit.
Run/Stop Events Mode: Hold the Reset button until the reset LED (
g
) blinks once (~3 sec.), then release and within
1 second, press Reset momentarily (<1 sec.).
This mode toggles events either On or Off.
Reset All IP Settings Mode: Hold the Reset button until the reset LED blinks twice (~6 sec.), then release and within
1 second, press Reset momentarily (<1 sec).
This mode resets the IP address, subnet, gateway, port mapping, and DHCP settings back to factory defaults. The
reset LED blinks 4 times in quick succession, confirming the reset and turning events off.
Reset Factory Defaults Mode: Hold the Reset button until the reset LED blinks 3 times (~9 sec.), then release and
within 1 second press Reset momentarily (<1 sec).
This mode causes a complete reset to factory defaults (except firmware).
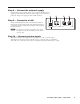
There are five screens selected by pressing the appropriate button
at the left and upper right side of the screen. There is also an Exit
button at the bottom right corner of the screen for leaving the setup
menus.
The setup menu pages adjust the following features. For additional
details, see the User's Manual.
Main (shown at right) — Adjusts the Sleep timer, Backlight,
Auto Backlight, and LED Backlight functions.
Volume — Adjusts the Master, Click, and Sounds volume settings.
Time — Sets the correct time and date.
Network (IP) — Sets the IP address, the subnet mask, and enables
or disables Dynamic Host Configuration Protocol.
Video — provides a small video preview window and the controls
to set up the video contrast, color, brightness, and tint.