
Installation guide


VoiceLift Microphone Installation • Installation — Overview
2-2
Installation — Overview, cont’d
Outline of installation steps
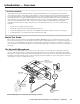
Stage 1 — Install the VLR 102 Receiver
Drop ceiling:
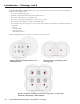
c Cut a hole in the ceiling tile. (page 2-4)
c Mount the receiver housing to the ceiling tile. (page 2-4)
c Attach a conduit to the back plate if needed. (page 2-5)
Junction box:
c Install the junction box. (page 2-6)
c Attach the receiver housing to the junction box. (page 2-6)
c Attach a conduit to the junction box if needed. (page 2-6)
Wall or other hard surface:
c Install a raceway if needed. (page 2-7)
c Mark the mounting screw locations on the surface. (page 2-7)
c If using a raceway, remove the appropriate knockout in the receiver
housing. (page 2-7)
c Mount the receiver housing to the surface. (page 2-8)
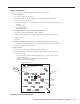
Stage 2 — Connect the VLR 102 Receiver to the PoleVault System
c Pull the cables to the receiver. (page 2-10)
c Connect the cables to the receiver. (page 2-10)
c Attach the receiver dome to the housing. (page 2-11)
c Pull cables to the PoleVault switcher. (page 2-13)
Stage 3 — Configure and Test the System
c Congure the system. (page 2-14)
c Set up the microphone. (page 2-14)
c Test the system. (page 2-14)
c Complete the installation. (page 2-15)