
Installation guide

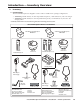


VoiceLift Microphone Installation • Introduction — Planning
1-3
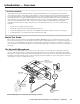
Room considerations
Room factors to be considered should include, but are not confined to:
• Room conguration
Room size, orientation, and layout
Location of windows, doors, skylights, etc., for potential light interference
Alcoves, bays, or sheltered areas
Location of any dark or covered walls (Dark surfaces reduce reflection of the IR signal.)
– Wall art
– Curtains/blinds
– Acoustical panels
– Wall material/texture
• Line-of-sight obstructions between microphone and receiver
Existing movable furniture (desks, tables, podiums)
Existing installed furniture (bookcases, racks, cabinets, workbenches, sinks, etc.)
Support pillars
Projector
• Ceiling and wall type (important in assessing the installation hardware needed)
Ceiling type (drop, spline, hard lid, etc.); structural type (wood, concrete, trusses)
Wall type (drywall, cement, brick, etc.)
• Receiver location
Best location: on the ceiling, at the middle of the classroom
If ceiling mounting is not possible, place high and centered on the longest wall.
Locations to avoid:
– Places where line of sight could be obstructed; e.g., too close to the projector
– Corners of the room
– On walls, at less than 6' or more than 12' up from the base
– Areas that receive direct sunlight
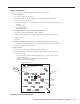
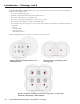
Student Desks
Teacher’s Desk
TV / VCR / DVD
Inputs
Screen/White
Board Location
MLC Controller
Location
PVT A/V Wallplate Location
Projector/
Switcher
Location
Speaker
Locations
Potential
VLR 102 IR
Receiver
Locations
Example of a classroom installation