
User Guide Rev. D User Manual


VTG 300/300R • OperationVTG 300/300R • Operation
Operation, cont’d
2-7
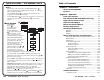
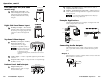
Default menu
The default menus appear on the LCD when no adjustments are
actively being made. They cycle between the screens showing
the currently selected horizontal scan frequency of the video
output signal, the audio output level, and the audio frequency,
as shown below.
VGA 31.5kHz
640x480 @60
Power
on
3 sec.
3 sec.
3 sec.
AUDIO LEVEL
-10dBu 245mV
AUDIO FREQ.
800 Hz
60-543-01
FW Ver. 1.00
EXTRON
VTG 300
60-543-02
60-543-02
FW Ver. 1.00
FW Ver. 1.00
EXTRON
EXTRON
VTG 300R
VTG 300R
or
Figure 2-1 — Default menu cycle
From any menu or submenu, after 20 seconds of
inactivity the VTG will save all adjustment settings and
time out to the default menus.
A different default menu is displayed when the screen
saver option is active. See Screen saver timer
submenu (ScrSvr Timer) in this chapter.
If an output was disabled at power up, the menu will
display “Audio disabled” or “Video disabled” instead of
the normal menu. See Enable at power up submenu
(Enable@PwrUp) in this chapter.
2-6
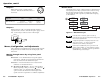
Output 2
Balanced mono audio is output from this
connector. Wire the female XLR connector as
shown here.
Application Pin 1 Pin 2 Pin 3
Balanced audio (std.) gnd (shield) positive (+) negative (-)
(on sending/ female connector) (hot/live) (cold/return)
3-pin XLR Pin Configuration
Output 3
Unbalanced mono audio on both left and right channels is
output from this connector. Wire the mini phono plug as shown
here. See the Output 3 submenu section in this chapter.
Sleeve ( )
Ring (R)
Tip (L)
Menus, Configuration, and Adjustments
VTG configuration and adjustments are performed by using the
front panel controls and the menus that are displayed on the
LCD screen.
Moving through menus by using front panel
controls
Menu button — Press the Menu button to step through the
main menus. After 20 seconds of inactivity, the VTG will
time-out and return to the default menu cycle.
Next button — Press the Next button to move between the
submenus of a selected main menu.
Up (
) and Down ( ) buttons — Use any of these buttons
(Level, Frequency, or Rate), to increase (
) or decrease ( )
submenu values, or to alternate between submenu
options. Refer to the flowcharts in this chapter and to
specific sections for explanations on submenu adjustments.
2
3
1