
User Guide Rev. D User Manual
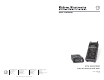


VTG 300/300R • Quick Start Guide
Quick Start Guide — VTG 300/300R, cont’d
VTG 300/300R • Table of Contents
Chapter 1 • Introduction ..........................................................1-1
About the VTG 300/300R .................................................... 1-2
Features ...................................................................................... 1-2
Chapter 2 • Operation ................................................................ 2-1
Front Panel Features ............................................................2-2
Left Side Panel LED (VTG 300R model only) ........... 2-4
Right Side Panel Power Input ......................................... 2-4
Top Panel Video Output ...................................................... 2-4
Bottom Panel Audio Output ............................................. 2-4
Example Applications ......................................................... 2-5
Connecting Audio Outputs ................................................2-5
Output 1 ................................................................................. 2-5
Output 2 ................................................................................. 2-6
Output 3 ................................................................................. 2-6
Menus, Configuration, and Adjustments................... 2-6
Moving through menus by using front panel controls ......... 2-6
Default menu .........................................................................2-7
Main menus ............................................................................2-8
Test Pattern Setup menu ...................................................... 2-8
Grayscale submenu ................................................................ 2-9
White field submenu ............................................................. 2-9
Audio Setup menu .................................................................2-9
Audio units submenu (Units) ................................................ 2-9
Output 3 submenu .............................................................. 2-10
Video Setup menu ............................................................... 2-10
HD15 Video format submenu (HD15 Format) .................... 2-10
RGB Sync format submenu (RGB Sync Fmt) ....................... 2-11
Raster border submenu (RasterBorder)............................... 2-11
Advanced Setup menu......................................................... 2-11
Power off timer submenu (PwrOff Timer) .......................... 2-11
Screen saver timer submenu (ScrSvr Timer) ........................ 2-12
Screen saver mode submenu (ScrSvr Mode) ....................... 2-12
Enable at power up submenu (Enable@PwrUp)................. 2-13
Backlight submenu (BackLight) .......................................... 2-13
Unit Reset submenu (Press & Hold) ..................................... 2-14
Exit menu ............................................................................. 2-14
Additional Functions ..........................................................2-15
Low Battery mode ............................................................... 2-15
Table of Contents
i
AUDIO
SETUP
MENU
MENU
TEST PATTERN
SETUP
MENU
VIDEO
SETUP
MENU
ADVANCED
SETUP
MENU
NEXT
MENU
TO EXIT MENU
PRESS NEXT
Power
on
60-543-01
FW Ver. 1.00
EXTRON
VTG 300
VGA 31.5kHz
640x480 @60
3 sec.
3 sec.
3 sec.
AUDIO LEVEL
-10dBu 245mV
AUDIO FREQ.
800 Hz
QS-2
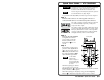
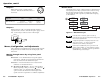
Step 4
If generating a video signal, press the Test Patterns button
8
to
select a test pattern type, as indicated by the lit LED. See Selecting a
Video Test Pattern in chapter 2.
Press the Range button
9
to select from among the four video
range types, as indicated by the lit LED.
Press the Rate buttons
10
to select from among the scan rates for the
selected range, then press the Select button
11
to activate the
selection.
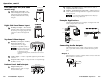
Menu System
Use the Menu
button
5
to
advance through
the main menus.
Use the Next button
6
to navigate through the
submenu system. See the
Menus, Configuration, and
Adjustments section in chapter 2.
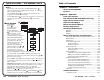
Grayscale or white field: To
select a grayscale or white field
test pattern, select the Test
Pattern Setup main menu, then
go to the the Grayscale
submenu or the White Field
submenu and press any
or
button to make a selection. The
grayscale choices are 32-level
split and ramp. The white field
choices are full field, 80% window, and 20% window.
To select the audio level unit dBV or dBu: Select the Audio units
submenu from the Audio setup main menu, then press any
or
button to make a selection.
To select RGB or Y, B-Y, R-Y: Select the HD15 Video format submenu
from the Video Setup main menu, then press any
or button to
make a selection.
Enable@Power Up feature: Select which outputs (audio or video) are
enabled when the VTG is turned on. This feature is only available
when the unit is disconnected from AC power. Select the
Enable@PwrUp submenu from the Advanced Setup main menu,
then press any
or button to make a selection.
Button Lock mode: Press the Signal
2
and Test Patterns
8
buttons
simultaneously for 2 seconds to enable/disable front panel buttons.