User Guide Specialized Products VTG 300/300R Video and Audio Test Generator 68-737-01 Rev.
Safety Instructions • English Warning This symbol is intended to alert the user of important operating and maintenance (servicing) instructions in the literature provided with the equipment. Power sources • This equipment should be operated only from the power source indicated on the product. This equipment is intended to be used with a main power system with a grounded (neutral) conductor. The third (grounding) pin is a safety feature, do not attempt to bypass or disable it.
FCC Class A Notice This equipment has been tested and found to comply with the limits for a Class A digital device, pursuant to part 15 of the FCC Rules. Operation is subject to the following two conditions: 1. This device may not cause harmful interference. 2. This device must accept any interference received, including interference that may cause undesired operation.
Conventions Used in this Guide Notifications In this user guide, the following are used: WARNING: CAUTION: NOTE: A warning warns of things or actions that might cause injury, death, or other severe consequences. A caution indicates a potential hazard to equipment or data. A note draws attention to important information. TIP: A tip provides a suggestion to make working with the application easier. Copyright © 2011 Extron Electronics. All rights reserved.
Contents Introduction............................................................ 1 Reference Information........................................ 23 About the VTG 300/300R.................................... 1 Features............................................................... 1 Specifications..................................................... 23 Included Parts.................................................... 25 Operation.................................................................
VTG 300/300R • Contents vi
Introduction This section provides an overview of the VTG 300 and VTG 300R and describes their features. About the VTG 300/300R The Extron VTG 300 and the VTG 300R are portable, hand-held video and audio test generators. The VTG 300R features an integrated battery pack and charger, otherwise both models offer the same functions and features. “VTG” and “video test generator” refer to both the VTG 300 and the VTG 300R and are used interchangeably.
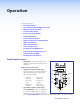
Operation This section describes: • Front Panel Features • Left Side Panel LED (VTG 300R model only) • Right Side Panel Power Input • Top Panel Video Output • Bottom Panel Audio Output • Example Applications • Connecting Audio Outputs • Menus, Configuration, and Adjustments • Additional Functions • Audio Testing Features • Video Testing Features • Installing the VTG 300 Batteries • Conserving the VTG 300 Battery Life • Recharging the VTG 300R • Installing the Protective Boot Fr
The audio output level settings for all audio signal types are retained after the VTG is powered off. The default setting is -28 dBu for polarity and -10 dBu for all other signal types. NOTE: • If the Level buttons are held down for more than one second, the VTG will automatically increment the level adjustment in the direction indicated by the button.
Left Side Panel LED (VTG 300R model only) Battery charge status LED — The amber LED lights steadily when the VTG is being charged, and blinks steadily when the VTG is fully charged. Left side panel CHARGE STATUS Battery charge LED Right Side Panel Power Input Right side panel 12 VDC Power Input 12 VDC 1A 12 VDC power input — The included external 12 VDC, 100 VAC to 240 VAC, 50/60 Hz power supply plugs into this connector located on the right side panel.
Example Applications Figure 1 shows examples using the video and audio testing features of the VTG. Extron 15 pin HD VGA Cable Top view 70V Mono Distribution RGB/Y,R-Y,R-Y S-VIDEO COMPOSITE VIDEO 100-240V Front view 50-60Hz INPUTS 1 2 Y C EXTRON VTG 300R SCANS 15-127KhZ CROSSHATCH W. NOISE H.
Menus, Configuration, and Adjustments VTG configuration and adjustments are performed by using the front panel controls and the menus that are displayed on the LCD screen. Moving Through Menus by Using Front Panel Controls • Menu button — Press the Menu button to step through the main menus. After 20 seconds of inactivity, the VTG will time-out and return to the default menu cycle. • Next button — Press the Next button to move between the submenus of a selected main menu.
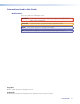
Main Menus The main menus are shown in the following flowchart. Use the Menu button to step between main menus. Power on EXTRON VTG 300R 60-543-02 FW Ver. 2.04 VGA 31.5kHz 640x480 @60 3 sec. AUDIO LEVEL -10dBu 245mV 3 sec. AUDIO FREQ. 800 Hz 3 sec.
White field submenu There are three types of white field test patterns. Press any or button to select the test pattern: • Full field (default) — evaluate white field and color uniformity. • 80% window — fine tune color balance and gain (drive) for each of the red, green, and/or blue color adjustments. • 20% window — fine tune color balance and bias (offset) for each of the red, green, or blue color adjustments. Audio Setup Menu The following flowchart illustrates the Audio Setup menu.
Video Setup Menu The following flowchart provides an overview of the Video Setup menu. Extron VTG 300R MENU VIDEO SETUP NEXT HD15 Format RGB HD15 Video formats • RGB (default) • Y, R-Y, B-Y NEXT RGB Sync Fmt RGBHV NEXT RasterBorder On RGB Sync formats • RGBHV (default) • RsGsBs • RGsB • RGBS Raster Border • On • Off (default) NEXT Figure 6. Video Setup menu HD15 Video format submenu (HD15 Format) There are two video formats that can be output from the 15-pin HD connector.
Advanced Setup Menu The following flowchart provides an overview of the Advanced Setup menu. Extron VTG 300R MENU ADVANCED SETUP NEXT PwrOff Timer 15 min Screen Saver Timer • Disabled (default) • 5 minutes • 10 minutes • 15 minutes Power Off Timer • Disabled • 5 minutes • 15 minutes (default) • 30 minutes Press & Hold & to reset NEXT Unit Reset • Simultaneously press and hold any of the three and button pairs for two seconds to reset the VTG to factory default settings.
EXTRON VTG 300R Power on 60-543-02 FW Ver. 2.04 VGA 31.5kHz 640x480 @60 3 sec. AUDIO LEVEL -10dBu 245mV 3 sec. AUDIO FREQ. 800 Hz 3 sec. 3 sec. SCREEN SAVER ACTIVE Figure 8. Screen Saver Default Menu Cycle Screen saver mode submenu (ScrSvr Mode) If the screen saver timer has been enabled (see the Screen saver timer submenu), the resulting screen saver display may be in one of two modes.
Enable at power up submenu (Enable@PwrUp) This submenu only displays when the VTG is powered by batteries. When enabled, this feature allows the VTG to set the active audio and/or video output during power up. This is a power saving feature of the VTG. Press any or button to enable the selected outputs: • Last used (default) – only the last used functions (audio or video) output is enabled during power up. • Video only (Vid) – the video outputs are enabled and the audio outputs are disabled.
Exit Menu The flowchart in figure 9 describes the Exit menu. Pressing the Next button from this menu will return you to the default menu cycle. EXTRON VTG 300R 60-543-02 FW Ver. 2.04 VGA 31.5kHz 640x480 @60 AUDIO LEVEL -10dBu 245mV 3 sec. AUDIO FREQ. 800 Hz 3 sec. 3 sec. MENU AUDIO SETUP MENU VIDEO SETUP MENU ADVANCED SETUP MENU NEXT TO EXIT MENU PRESS NEXT MENU Figure 9.
Button Lock Mode To prevent accidental changes to settings, simultaneously press and hold the Signal and the Test Patterns buttons for two seconds to enable the VTG’s Button Lock mode (see the figure 11). Button Lock mode locks all front panel buttons except Power. When Button Lock mode has been enabled, the message “Button Lock Enabled” is displayed for 2 seconds before the VTG returns to the default cycle. Power on EXTRON VTG 300R 60-543-02 FW Ver. 2.04 VGA 31.5kHz 640x480 @60 3 sec.
Audio Testing Features The VTG can output from among six different audio signal formats. The audio level can also be selected from a range of levels available for each audio format. Depending on the audio signal format, the audio frequency may be selected from a range of values (see Front Panel Features on page 2 for button descriptions). Selecting Audio Signals The following table summarizes the six audio signal formats available through the VTG.
Setting the Audio Frequency The audio frequency for each audio signal type is selected from a range of values using the or Frequency buttons and observing the LCD. The following table lists the available frequencies. Audio Signal Format Audio Frequencies Pink Noise Not Applicable White Noise Not Applicable Sine Wave 20 Hz, 25 Hz, 31.5 Hz, 40 Hz, 50 Hz, 63 Hz, 80 Hz, 100 Hz, 125 Hz, 160 Hz, 200 Hz, 250 Hz, 315 Hz, 400 Hz, 500 Hz, 630 Hz, 800 Hz, 1.0 kHz, 1.25 kHz, 1.6 kHz, 2.0 kHz, 2.5 kHz, 3.
Figure 13.
Selecting a Video Test Pattern Pressing the Test Patterns button will determine what category of test pattern to display. The signal range and/or the output rate also determine the actual test pattern. Figure 14 provides a description of the available test patterns. Crosshatch - 32 x 24 Static and Dynamic Convergence This pattern can be used to set projector focus and geometry.
Selecting a Signal Range Press the Range button to select from either a computer output rate (PC), video output rate (NTSC, PAL, and so forth), HDTV output rate, or 16:9 HR output rate. Setting the Scan Rate The scan rate for a signal range is selected from a list of rates using the or Rate buttons and observing the LCD. The scan rate options are as follows: Output type Rate PC ............ VGA 31.50 kHz, 640x480 @ 60 Hz ............ VGA 37.50 kHz, 640x480 @ 75 Hz Video HDTV ............
Output type Rate 16:9 HR ............ WSXGA* (cont.) ............ WSXGA+1* 55.94 kHz, 1440x900 @ 60Hz ............ WSXGA+2* 65.29 kHZ, 1680X1050 @ 60Hz ............ 1080P PC 67.20 kHz, 1920x1080 @ 60Hz ............ WUXGA1* 74.04 kHz, 1920x1200 @ 60 Hz ............. NOTE: 64.67 kHZ, 1680X1050 @ 60Hz WUXGA2 74.60 kHz, 1920x1200 @ 60 Hz • For NTSC/PAL rates, the component video output is intended for signal verification and alignment, and should not be used as a reference. ** Firmware 2.
Conserving the VTG 300 Battery Life In order to conserve battery life, batteries should be removed from the VTG 300 if it will not be used for an extended period of time. For information specific to the VTG 300R charging system, see the following section Recharging the VTG 300R.
Installing the Protective Boot The included protective rubber boot protects the VTG from abuse and shock while it is in use. The boot may also be reversed to protect the front panel when not in use (see figure 16). -Y ,B -Y ,R /Y B G R O E ID -V S M O C IT S O P E Front panel accessible for normal operation VIDE & AU DIO TE VT ST G 30 GE 0R NE RA TO M O C O E ID -V S P.N OIS ISE AL SQ UAR TE PO SHA TCH H.
Reference Information This section provides information on: • Specifications • Included Parts Specifications Video signal characteristics Dot clock ���������������������������������������� Pixel clock accuracy ������������������������ Horizontal frequency ���������������������� Vertical frequency ��������������������������� Rise/fall time Composite and S-video ������������ All other signal types ��������������� 108 MHz (max.
Audio THD + Noise ����������������������������������� 0.06% @ 1 kHz at nominal level Flatness ������������������������������������������ ±0.1 dB Accuracy ���������������������������������������� ±0.7 dB Audio output Number/signal type ������������������������ 1 mono, balanced 2 mono, unbalanced Connectors ������������������������������������ (1) 3.
Regulatory compliance Safety �������������������������������������� EMI/EMC ��������������������������������� MTBF ��������������������������������������������� Warranty Product ������������������������������������ VTG 300R battery pack ������������ VTG 300 only: CUL, UL CE, C-tick, FCC Class A, ICES, VCCI 30,000 hours 3 years parts and labor, excluding the VTG 300R's rechargeable battery pack 90 days NOTE: All nominal levels are at ±10% NOTE: Specifications are subject to change without notice.
Extron Warranty Extron Electronics warrants this product against defects in materials and workmanship for a period of three years from the date of purchase.