
User manual


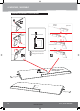
Table Of Contents
- Achtung: Kein Spielzeug! Für Jugendliche unter 14 Jahren nur unter Aufsicht Erwachsener geeignet. Warning: This is not a toy! Suitable for young people under the age of 14 with adult supervision.
- ALLGEMEINE SICHERHEITSHINWEISE FÜR MODELLE MIT ELEKTROANTRIEB
- GENERAL SAFETY INSTRUCTIONS FOR ELECTRIC MODELS
- QUERRUDER SERVOS / AILERON SERVOS
- 4. MONTAGE / ASSEMBLY
- 4. MONTAGE / ASSEMBLY
- 4. MONTAGE / ASSEMBLY

Manual Commander 3.indd 6
07.11.17 11:00
6
Art.-Nr. / Item-No. X8981/X8982
MODELLBAU
WERKZEUGE / TOOLS
Für die Montage benötigen Sie das nebenstehende
Werkzeug und Klebstoff (nicht im Lieferumfang
enthalten).
For assembly, you will need the shown tools and
glue (not included).
1
Motorhaube / Cowling
2
Tragflächen / Main Wing (B1, B2)
3
Rumpf / Fuselage
4
Höhenleitwerk / Horizontal Stabilizer
5
Vertical stabilizer
6
Alu Steckungsrohr / Alu Wing Joiner
7
Hauptfahrwerk / Main Gear
3b
8
Canopy fuselage (
3a
: Pilot,
3b
: Main canopy,
3a
9
3c
: Top canopy )
Spinner
3c
5
B1
4
3
1
B2
9
6
100 mm Schubstange
900 mm Schubstange
- 1
1000 mm Schubstange
- 1
Flaslink
- - - - 2
Nylon Clevis
- - - - 4
Connector
- - - - - - - - - 2
2x10 mm Tp Screw
- - - -
8
1.7x8mm Cap Screw
- - - 12
Horn
- - - - - - - 4
3mm Hex Nut
- - - - - 4
3x15mm Socket head Cap Screw
- - - - - 4
3x12mm Tp Screw
- - - 2
3.9x16mm Tp Screw
- - - 4
3x15mm Tp Screw
- - - - 12
Wheel Collar
- - - - - - - - 3
Plastic Collar
- - - - - - - - 3
4x4mm Setscrew
- - - - - - - - 3
400mm Pushrod wire
- - 1
4. MONTAGE / ASSEMBLY
ERKLÄRUNG DER SYMBOLE / EXPLANATION OF SYMBOLS
Überschuss abschneiden!
Cut off excess!
Markierte Fläche abschneiden!
Cut the marked area!
Schraubensicherung verwenden!
Use Screw Cement!
Genau beachten!
Notice!
Achtung!
Attention!
Mit Sekundenkleber verkleben!
Use Cyano Glue!
Mit Epoxydharz verkleben!
Use Epoxy Glue!
Eine
linke und eine rechte Seite
bauen!
Build a left and a right side!
Nicht im Lieferumfang enthalten!
Not included!
Auf Leichtgängigkeit achten!
Move freely, NO binding!
Loch bohren
mit dem
dargestellten Durchmesser.
Drill
a hole with the shown diameter
Vorgang x
-mal wiederholen.
Repeat this step.
Schrauben gut festziehen! Falls sich die Verbindung im Flug löst, gerät das Modell außer Kontrolle!
Set all screws securely. If they come off during flight, you will lose control of the aircraft.