
Installation Guide


11
Installing the Pergola Parts
These parts are heavy. For safety, you will need two or more people to do this assembly.
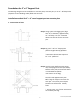
1. Assemble Base / Cap / Wing Bracket / Extension Column
Step 1. Slide the Cast Stone Base (F) over the top of
the 4" x 4" support post. Use four #8 x 1 1/2”
Philips Wood screws (Item 5) to secure the
galvanized fastening bracket at the top of the
Base into the 4" x 4" support post.
Step 2. Slide the Base Cap (E) over the 4" x 4" post and
seat it onto the base. Secure it with exterior
silicone to the base top edges.
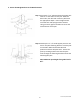
Step 3. Measure the Extension Post (D) and add 1/8”
to 1/4” for Load Plate spacing. Take the total
measurement which should be roughly 61 1/8”
and mark a line up from the Base Cap (E).
Draw a straight line at the top of the post and
carefully remove the excess post material with
a saw.
Step 4. Align the groves on the Load Plate (Item 2) with
the Wing Bracket (Item 1) arm extensions that
fit over the 4”x4” post. Slide the two brackets
together and place on top of the 4”x4” post.
Use twelve #8 x 1 1/2” Pan Head screws (Item
6) to attach Wing Bracket to 4”x4” post. Ensure
load plate moves freely prior to installing. Once
installed remove Load Plate. Note: Determine
the desired direction for the Notched Beams.
Then orient the Load Plate and Wing Bracket.
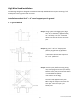
Step 5. Squeeze Wing Bracket beam attachment arms
together completely and secure. Carefully slide
Extension Column (D) over Wing Bracket and
4’x4” post. Make sure bracket at the top of the
Extension Column is positioned opposite of the
Wing Bracket extension arms screwed into the
4”x4” post. Use four #8 x 1 1/2” Philips Wood
screws (Item 5) to secure Extension Column to
4”x4” post.
D
E
F
Item 1
Item 2
Version 3.0, March 2010