
Owner Manual


EYEVAC BILINGUAL:Layout 1 1/10/10 5:08 AM Page 3
English
Turn Control Dial
to
the MAN position
for
manual operation
or to
the AUTO position
for
automated use. The POWER
Indicator Light
will
illuminate when the Control Dial
is in
either
of
these
positions.
Your EYE-VAC HOME
is
now
ready for
use.
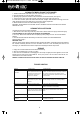
OPERATING
INSTRUCTIONS
NOTE: EYE-VAC HOME cannot operate when the Control Dial is in the OFF
position.
1. Turn the Control Dial
to
the MAN position
for
manual operation
or to
the AUTO position
for
automated use. The
POWER Indicator Light
will
illuminate when the Control Dial
is in
either
of
these
positions
2.
In
the MANUAL Mode, sweep debris towards the Inlet at the Base
of
the unit, press the Manual Activation
Button
and let EYE-VAC HOME vacuum the debris through the Inlet and into the Collection
Bin.
NOTE:
1.
The MANUAL Mode
will
run
for 7.5
seconds. Depending on the amount
of
debris,
it
may be necessary
to
press
the
Manual Activation Button more than
once.
2. When the Control Dial
is
turned
to
the AUTO position, sweep debris towards the Inlet at the Base
of
the unit
and
the Eye-Vac™ Sensors
will
detect the debris and automatically initiate a timed vacuuming cycle which
will
terminate
once the Eye-Vac™ Sensors no longer detect debris. EYE-VAC HOME
will
vacuum the debris through
the
Inlet and
into the Collection Bin without you ever having
to
bend over
or
touch the
dirt.
3. Use the Manual Activation Button
to
begin vacuuming
in
either the MANUAL
or
AUTO
Modes.
4. As debris accumulates, the Collection Bin
will
need
to
be emptied. The Collection Bin Indicator Light lets you
know
when
it’s
time
to
empty the Collection
Bin.
USER MAINTENANCE INSTRUCTIONS
1. To empty the EYE-VAC HOME Collection Bin, turn the Control Dial
to
the OFF
position
and
unplug the
unit.
2. Pull the Collection Bin outward from the front
of
the Bin Cavity. Grasp the Collection Bin Grip firmly and
lift it out
and away from the EYE-VAC HOME Main
Unit.
3. Holding the Collection Bin firmly with one hand, grasp the Collection Bin Lid Handle with the other hand and
pull
the Lid straight up and out
to remove.
4. Turn the Collection Bin upside down over a trash can. Make sure you empty all
dirt
and debris from inside
and
below the Bin. To ensure that all the
dirt
spills out, tap the side
of
the Collection Bin gently against the edge
of the
trash can. Re-attach the Collection Bin Lid
to
the top
of
the Collection
Bin.
5. Clean Sensors, Dirt Inlet area and Collection Bin Cavity with a damp rag
or towel.
6. Insert the assembled Collection Bin with Lid fitted snugly into position bottom-first into the Collection Bin Storage
Cavity at the front
of
the EYE-VAC HOME. The
2
grooves
in
the bottom
of
the Bin
fit
easily over the rod
in
the front
of
the unit. Grasp the Collection Bin Grip and lock the Collection Bin back into
position.
HEALTH
TIP
If
you suffer from allergies
or
asthma, take the Collection Bin outdoors
to
empty. As you empty the
dirt
into the
trash
can, gently tap the Collection Bin against the side
of
the can
to
remove loose
debris.
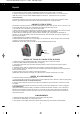
CLEANING THE DIRT
FIL
TER
To maintain optimal performance, the Dirt Filter
will
need cleaning whenever the suction
is
not strong. The Dirt
Filter
must be clean and free
of
elements, which might hinder the flow
of air.
1. Turn the Control Dial
to
the OFF
position and unplug the
unit.
2. Pull the Collection Bin outward from the front
of
the Bin Cavity. Grasp the Collection Bin Grip firmly and
lift it out
and away from the EYE-VAC HOME Main Unit. Locate the Dirt Filter
Handle.
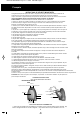
3. Remove the Dirt Filter by grasping the Dirt Filter Handle and turning counter-clockwise
to
the “unlock” position.
Pull
the Filter straight up and out
of
top
of
the Collection Bin (See Figure 3.). Rinse under running water
to clean.
4. IMPORTANT! Dry thoroughly before
use.
5. Slide the Dirt Filter back into the top
of
the Collection Bin. Rotate clockwise
to
the “lock” position. Put the
Collection
Bin back into
place.
IMPORTANT! NEVER OPERATE THE EYE-VAC HOME WITHOUT THE DIRT FILTER PROPERLY
IN PLACE.
Figure 3
Micro
Exhaust
Filter Holder
Figure
4
Figure
5
3