
Installation Guide


STEP 4:
Hint: Place railing section on edge of 2x4 lumber to fasten bottom post
mounts.
1. Ensuring the gap from the top of the deck (ground) to the bottom of the
bottom channel (D) is less than 4", and that the top of the rail meets
your code requirements, vertically center your railing. Now attach the
bottom post mounts (F) to the existing or post using the proper
fasteners (C) provided. Reminder: Typically residential minimum handrail
height is 36" and commercial handrail height is 42".
2. Ensuring your railing is centered vertically on the post, fasten the
top post mount (E) using the proper fasteners provided.
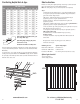
3. Now move to the other end of the railing section. Using a level (or
resting railing on edge of 2 x 4 lumber) confirm your railing section is
positioned at the correct height. Vertically center on post and fasten the
2nd bottom post mount using the proper fasteners provided.
4. Vertically center the top rail to the post and fasten the 2nd top post
mount using the proper fasteners provided.
5. Fasten the top post mounts (E) to the top (A) on non-visible side
of railing. PILOT HOLE MUST BE DRILLED! Use the 1" self tapping
fasteners provided. Repeat steps for bottom rail mounts (F).
Note: Refer to Post Installation Page near beginning of instructions for proper
post installation
11
www.maddenmetals.com
You have completed your level railing Installation.
Stairs and gate instructions follow.
Stair Railing Assembly and Installation
STEP 1: STAIRS
1. Review the instructions and make yourself familiar with the included items.
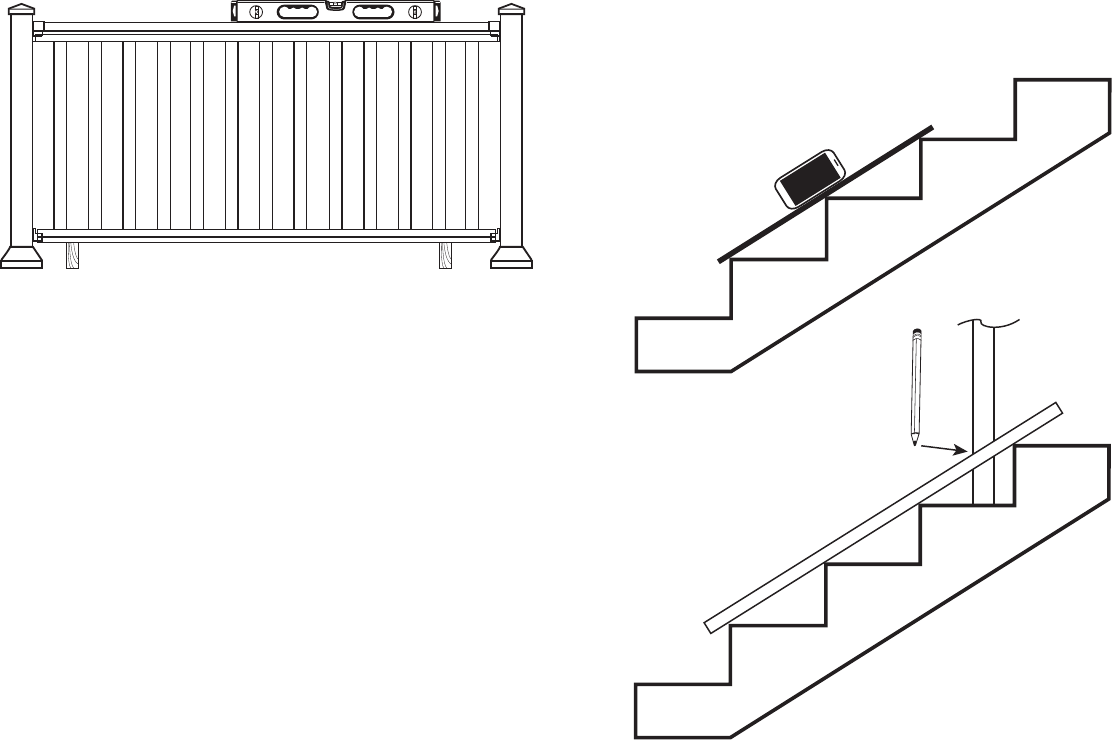
2. Measure the stair rise and run then determine the angle using the
rise/run chart on the following page. We also recommend verifying your
angle using an angle nder app on your Android or iPhone – see
recommendations on the following page. Make sure to measure the angle
at the top, middle and bottom of stair run!
3. Set your miter box/chop saw to the appropriate stair slope angle and
cut each end of the picket (B) (baluster). MAKE SURE YOU CUT BOTH
ENDS PARALLEL TO ONE ANOTHER SO TOP AND BOTTOM RAILS ATTACH
PROPERLY. ALSO ALIGN THE SCREW CHANNELS!!!
4. Visually verify the picket angle is correct by setting between top and
bottom rails and holding in place on stair slope. Carefully cut the
remainder of the pickets EXACTLY THE SAME SIZE!
5. After all the pickets are cut fasten them to the bottom channel (A) using
the 1 ½" fasteners provided in your railing kit. (Note: if the stair
slope is steep, the 1" fasteners included with the Pivot Mount Kit (sold
separately) may install easier. Be sure to use the same fasteners at the
top and bottom of the pickets).
6. Straighten the pickets by hand and fasten the top snap (D) to the
top of the pickets.
7. Slide the Top and Bottom Pivot Mounts onto the ends of each rail.
Set the railing section in place.
8. Position railing at proper height and mark or pilot holes in posts.
9. Attach pivot mounts to posts with railing section in proper position
10. After railing is securely in place pilot and secure fastener through pivot
mount into top rail on non visible side of railing. Repeat for bottom rail.
12
For assistance call Madden Manufacturing
573-365-7085
Typical stair slope
is 32.5 to 35 degrees
For questions or a video
demonstration visit
www.maddenmetals.com
Manually make a pencil mark
and cut with chop saw
Using iphone app