
Installation Guide


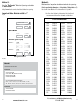

Contents
Contents/Introduction 2
Tools You Will Need (not included) 3
Curved Baluster Railing Components 4
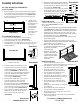
Curved Baluster Railing Assembly Overview 4
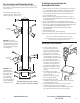
Illustrated Curved Baluster Railing Component 5
Pre-Sizing Top and Bottom Rails 6
Top and Botttom Rail Assembly 6
Baluster Infill Spacing 7
Installing Balusters 7
Determining Baluster Spacing 8-12
Care and Maintenance BC
Please take a moment to read the instructions
before you begin assembling your railing.
Introduction
Check the contents of Handrail box with these instructions to verify all parts
are present. This will allow you to become familiar with the components of
your new Handrail system.
• Inspectallcomponentpartsforfamiliarity
• Layoutrecommendedtools
• Beforecuttinganycomponent,knowitsuse–“measuretwiceandcutonce”
• Theincludedconcretefastenersareforbrickandconcrete
Handrail shown with Posts and
Base Covers sold separately.
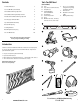
Tools You Will Need
(not included)
A - Level
B - Chop Saw (60 tooth wood blade)
C - Safety Glasses
D - 1/4" Hex Bit Driver
5/16" Hex Bit Driver
E - Tape Measure
F - Screw or Impact Gun
G - Pencil
H - Drill Bits: 1/8" wood, 1/4" wood,
1/4"x 3.5"concrete, 3/16" metal
B
D
F
H
C
E
G
I
A
J
2
www.maddenmetals.com
3
For assistance call Madden Manufacturing
573-365-7085
I - (2) pcs 10" 2 x 4 lumber
to support railing during
installation (optional)
J - Ear Protection
K - Automatic Center Punch
or Awl
L - Masking/Painters Tape
K L