
Installation Guide


6
www.maddenmetals.com
7
For assistance call Madden Manufacturing
573-365-7085
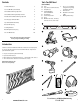
Assembly Instructions
Pre-sizing and Cutting Top and Bottom Rails
(prior to assembly):
1. Measure the distance between your posts from the inside edge of the
post to the inside edge of the other post. Ensure the measurement is
the same at the top and at the bottom of the posts (IIlustration #1).
If the measurements are different, your posts may not be level and
may need to be shimmed.
2. Cut both top and
bottom rail sections
½" shorter than your
measurements,
assuring they will
pass between the
posts without
scratching the post’s
surface during
installation.
Top and Bottom Rail Installation:
1. Place a short cut of 2"x4" lumber on edge near each post
perpendicular to the railing direction. (Illustration #2)
2. Slide mounting brackets (C) on each end of the bottom rail.
3. Setthebottomrailsection(withbracketsoneachend)ontothe2”x4”’s
and between the posts. The 2x4's will provide the proper 3 1/2" gap
below the bottom rail.
4. Centering the bottom rail bracket from each edge
of the post, fasten it using the 7/8" self-drilling
fasteners (E) for EZ Posts or 2" SMS fasteners (F)
for wood posts.IMPORTANT: Once the brackets are
secure on the posts, fasten the bracket and rail together
using a 7/8" self-drilling fastener. Drilling a pilot hole
with an 1/8" bit and fastening on the non-visible
side is preferable. (Illustration# 2).
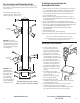
5. Measure from the decking up the post to 36 ¼" for
residential and 42 ¼" for commercial railing
make a pencil mark at the center of the post.
Repeat process at the opposite post. (Illustration #3)
6. Slide mounting brackets onto both ends of your top
rail (flat surface up) and hold the top of the top rail
in place at your pencil marks. (Illustration #3.5)
7. Using a baluster (C) test that the vertical spacing
between the rails, allows the baluster fasteners
holes to center on the railing fastener line.
(Illustration #4)
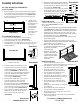
Illustration #2.5
(J)
(D)
Spacing is not to exceed 3 3/4" from the
bottom rail to the deck.
Predrill using
a 1/8" pilot hole.
Illustration #1
Illustration #3
Illustration #7
Note: A&B are
identical pieces
(A)
(B)
8. Holding the top of the bracket at your pencil mark, level
the top rail and fasten each bracket to your posts using
the appropriate fasteners provided (same fasteners
as the bottom rail). (Illustration #5)
9. Once the brackets are secure on the posts, fasten the
bracket and rail together using a 7/8" self-drilling
fastener. Drilling a pilot hole with an 1/8" bit and
fastening on the non-visible side is preferable.
Baluster Infill spacing:
To determine symmetric baluster spacing for your
railing section, REVIEW APPENDIX A and follow
the steps below.
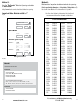
1. Determine your preferred baluster spacing from Appendix A. We recommend
using Method 2: Decks.com Baluster Calculator www.decks.com/calculators/
baluster-spacing.Also,werecommendthe“spacewidth”(distancebetween
balusters)tobe3¾”.However,ifthiscausesthe“outsidespace”tobe
greatly different than the baluster spacing, try smaller spacing calculations
foramoreuniformlook(e.g.31/2”).(Illustration #6)
2. Ifyourbalusterspacingisdifferentthan3¾”,cuttheincludedSpacer(F)
to your new spacing width.
3. Using the results from your decks.com calculations and the Spacer (F),
temporarily space the balusters to verify the overall layout. Start by stretching
your tape measure across entire bottom rail.
4. Make on-center marks (from decks.com calculator)
or use small pieces masking/painters tape on the
top vertical leg of the bottom
rail from left to right.
5. Verify if there are any height
variations of the balusters. This
is common. Move the shorter
length balusters to the middle
locations as they will be
installed first.
Installing the balusters:
1. Place the middle (shortest baluster) in its on
center mark spaced location and in between the top and bottom rails.
2. At the bottom hole of the baluster, mark the center
of the fastener hole using a punch or awl.
3. Atyourpunchmark,drilla3/16”pilothole
into the bottom rail using the included drill bit.
4. Secure the baluster to the bottom rail using a
5/16”hexbitanda7/8”fastener(E).
5. Level the baluster vertically. Double check with a
horizontal measurement from the post to the edge
of baluster at the top and bottom rails.
6. Set next baluster in place to the left using the
Spacer (F). Use the Spacer at both the top and
bottom rail.
7. Verify baluster is aligned with the on-center marks
on the bottom rail.
8. Punch bottom fastener location, drill pilot hole
and secure bottom of baluster with fastener.
9. Punch top fastener location, drill pilot hole and secure top
of baluster with fastener.
10. Repeat installing balusters on the left side and repeat from middle
to the end of the right side.
Illustration #6.5
Illustration #4
3 3/4"
Illustration #3.5
Illustration #5
Illustration #6
Illustration #2
3 3/4"