
Instructions / Assembly


PVC INTERLOCKING LINER PANEL
Technical & Install Guide
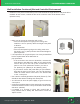
• Before installing panels, run a chalk line all around the bottom of the floor
about 1” (25mm) off the floor or use plastic spacers to create the necessary
gap off the floor (Picture C).
• Install trims at a maximum of 12” (300mm) centerline between screws.
• Jump to Ceiling and Wall Installation Continued.
Controlled Environment
• If the PVC
wall panels are installed in a controlled environment (non-wet),
then the J-Trim piece can be installed directly to the floor and no drain
holes are required.
• Jump to Ceiling and Wall Installation Continued.
Ceiling and Wall Installation Continued
Ceiling Installation
• Before beginning installation, it is important to determine the direction of the EZ Liner™ PVC
ceiling panels first.
• If the panels are running the length of the room and perpendicular to the trusses, make sure
to use Multi-H Trims to join the panel lengths together.
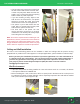
• If both the panels and joists are running the width of the room, a sub-frame needs to be
installed at 24” (600mm) on center. After the sub frame is completed, proceed to install the
PVC ceiling panels as indicated in Picture I.
• Start at one end and clip the PVC panel into the Inside Corner Cove.
• If installed in cold weather, make sure to cut back the PVC ceiling panel a ½” (12mm) to create a
gap for panel expansion.
• Fasten to the joists at a minimum of every 24” (600mm) centerline. If you do not hit a joist, add
a piece of wood blocking at the end of the PVC panel so the Multi-H Trim has a fastening point.
• Continue with these steps until the last panel. The last panel
will need to be cut a 1/2” (12mm)
smaller to create a gap for it to slide into the Inside Corner Cove
Picture C
Picture I
retail@polymershapes.com | (800) 421-0102
11