
Instructions / Assembly


PVC INTERLOCKING LINER PANEL
Technical & Install Guide
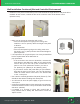
Wall Installation
• At each corner, insert the wall panels into the track of the Inside Corner
Cove. Cut back the face of the bottom J-Trim piece (Pictures D & E).
• If the PVC wall panel is going to the ceiling, make sure the panel is
cut ½” (12mm) shorter than the wall height for panel expansion.
• It is important to do a physical layout as it may be beneficial to have a
panel seam at an obstruction or pipe penetration.
• If the seam does not meet an obstruction, measure the total
distance and deduct the width of the panels being used so that you do
not end up with a small sliver of a panel at one end. (Determine
whether you have a 12” (300mm), 16” (400mm) or 18” (450mm)
PVC panel.)
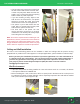
• If you need to cut the first panel after you pre-measure, start with
the panel in the corner. The cut end should go inside the
Inside
Corner Cove and in the bottom track of the J-Trim piece.
• Use a level to vertically plumb the first panel (Picture F). This should be
done before installing each PVC panel.
• You will need to “bow” the panel slightly to get it into the top J-Trim
piece (Picture G).
• Continue to install the balance of the panels with a 24” (600mm)
centerline between screws. The top and bottom screw should start at 12” (300mm) (Picture H).
• If installing in a concrete or block wall, pre-drill with a rotary hammer drill. A battery drill works well to
screw the Tapcon screws.
• The last panel may need to be inserted into the slot of the Inside Corner Cove trim with a sheet
rock putty knife. Make sure the last panel is cut ¼” (6mm) less than the opening
width to allow
for panel expansion.
Picture D
Picture E
Picture F
Picture G
Picture H
retail@polymershapes.com | (800) 421-0102
12