
Instructions / Assembly


PVC INTERLOCKING LINER PANEL
Technical & Install Guide
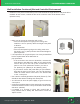
• Install the PVC ceiling panels without any trim at the junction of
the ceiling and wall.
• If panels
are installed in cold weather, make sure to follow
recommended clearances for panel expansion.
• After installation of the ceiling panels, install the J-Trim piece
based on the method of whether the J -Trim goes all the way to
the floor or not.
• Once all the PVC wall panels are installed (as per Wall Only
Installation) go back and install the Inside Corner Cove.
Food Safe Environment Installation Method
• If it is a food safe environment, use the 90-Trim piece
for the wall to ceiling transition.
• Make sure to install the 90-Trim around the
perimeter of the wall to ceiling joint first.
• The wall or ceiling PVC panels can be installed next.
• Jump to Wall and Ceiling Installation (page 10).
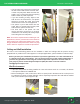
• If you are mounting a heavy object to the wall such as an electrical box, use plastic spacers to
prevent the panel from being crushed if the screws are overtightened.
• The spacer is just a little thicker than the panel. Drill a 1” (25mm) hole into the panel and insert the
spacer into the hole.
• The inner hole of the spacer can now receive any bolt or screw up to ½” (12mm) in diameter. This
will keep the heavy object from hitting the PVC wall panel.
Note: Account for expansion when installing in cold temperatures, ensure you have the correct
stainless steel screw for the substructure. Make sure to open the gap between each panel with a
sheet rock putty knife to allow for expansion in hotter temperatures.
You can special order any of the install components. If you have any questions concerning the
install components required or need to order for your project, please contact Polymershapes
at (800) 421-0102 or send an email to retail@polymershapes.com.
Regular Installation Method
retail@polymershapes.com | (800) 421-0102
13