
Instructions / Assembly


PVC INTERLOCKING LINER PANEL
Technical & Install Guide
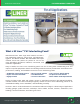
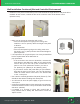
Installation Tools
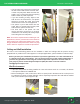
Lightweight and easy to install, EZ Liner™ PVC panels can be fabricated on site and require no special
equipment to install. Common tools needed: ladders/scaolding, rubber mallet, rotary hammer drill, drill
c/w hole saws, caulking gun, circular saw w/ne toothed blade, tape measure, box cutter, battery drill,
square and straight edge, chalk line, and sheet rock putty knife.
Acclimate Panels
To avoid warping or deformation, store EZ Liner™ PVC panels inside the room where they will be installed
for at least 24 hours before installation. This will minimize the amount of expansion or contraction after the
panels are installed. Make sure to remove or loosen any packaging material.
• Do not install panels until building is fully enclosed.
• Heating and cooling equipment should be in operation.
• Residual moisture from construction has been removed.
• Do not install panels in a room with temperatures under 40° Fahrenheit (5° Celsius) or above 86°
Fahrenheit (30° Celsius).
Important Information
Please read this entire guide prior to installation. There are dierent installation methods for walls only vs.
walls and ceilings. The information provided in this install guide is applicable for the 16”, and 18” wide EZ
Liner™ PVC interlocking panel.
• EZ Liner™ should not be used in applications where the ambient or surface temperature of the
PVC material will be above 122° Fahrenheit (50° Celsius).
• EZ Liner™ should not be used when installed as a component of an air duct system.
• All radiant heat must be at a minimum 18” (450mm) clearance from the PVC panel surface.
• If EZ Liner™ is being installed on walls and ceilings, it does not matter which is installed rst.
• Plan the layout of the EZ Liner™ and trims to achieve even spacing and alignment with
adjacent work.
• Determine panel layout and width of rst panel so the rst and last panel in each wall section will
be a minimum of 8” (200mm) wide.
• For ceiling applications, provide a clearance at either panel end of 1/4” (6mm) for expansion.
• For wall applications, provide a clearance of 1/2” (12mm) at the top of the wall for expansion.
• When installing in cold temperatures, make sure to open the gap between each panel with a
sheet rock putty knife to allow for expansion in hotter temperatures.
Note: EZ Liner™ PVC panels must be shielded from radiant heat with a minimum clearance of 18”
(450mm) between the heat source and the panel. Consult manufacturer of heater before installing panels.
If installing an epoxy oor, make sure the spray does not get onto the EZ Liner™ panels.
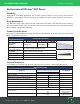
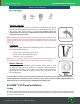
Install Components
Before beginning your project, conrm you have all the necessary install components. Most projects will
require one or more of the following:
PVC Trim Pieces
EZ Liner™ PVC comes with a full line of trims to help make your installation effortless. Standard
trim lengths are 8'
. See chart on next page for available trim pieces.
retail@polymershapes.com | (800) 421-0102
6