
Instructions / Assembly


PVC INTERLOCKING LINER PANEL
Technical & Install Guide
• Before cutting, clamp the panel to the work surface to avoid vibration.
• Use a ne-tooth blade (12 to 16 teeth per inch) designed to cut plastic.
• Install the blade in the reverse direction.
• Move saw at a slow advance rate to avoid chipping or cracking.
• Clean panels of any debris before installing.
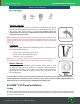
Note: For all cutouts, rst drill a hole in a corner of the opening. Then, insert
the jigsaw blade into the hole and cut along the marked lines of the opening.
Wall Only Installation
EZ Liner™ PVC interlocking panels can be installed on walls with the panel’s running perpendicular or
parallel to the main supports. For sloped applications, panels should run with the slope.
Before you start your installation, determine if your PVC application is in a wet environment or a
controlled (non-wet) environment.
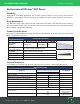
Wet Environment
• Install the Inside Corner Cove trim piece for the inside corners first. Take the trim to the top of
the wall and 1” (25mm) up off the floor.
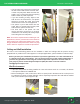
• If the PVC wall panels are being installed in a wet environment such as a car wash, the bottom
J-Trim piece needs to be installed next.
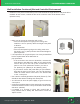
• Before installing the J-Trim, make sure to drill a ¼” (6mm) hole in the bottom of the J-Trim piece at
16” (400mm) on center for water drainage (Pictures A
& B). This is especially important if the walls
will be washed with a power washer.
• Before installing panels, run a chalk line all around the bottom of the floor about 1” (25mm) off the
floor or use plastic spacers to create the necessary gap off the floor (Picture C).
• Install trims at a maximum of 12” (300mm) centerline between screws.
• Jump to Wall Installation Continued (page 9).
Controlled Environment
• Install the Inside Corner Cove trim piece for the inside corners first. Take the trim to the top of the
wall and to the floor for a controlled environment.
• If the PVC wall panels are installed in a controlled environment (non-wet), then the J-Trim piece
can be installed directly to the floor and no drain holes are required.
• Jump to Wall Installation Continued (page 9).
Picture A Picture B Picture C
retail@polymershapes.com | (800) 421-0102
8