
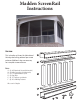
Instructions / Assembly
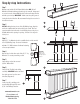

Step by step Instructions
Step 1
Measure and cut the (A) 2x2" Open Back bottom AND (A) 2x2"
Midrail to fit firmly between your vertical posts or walls. Using wood
or concrete screws, fasten ONLY the 2x2" bottom rail along the floor
with the open side up. IMPORTANT – Make sure the spline groove is
facing the desired direction. We recommend facing teh screen in for
elevated enclosures.
Step 2
BEFORE cutting the two pieces of the (B) Railing Snap, align the
end holes equidistant from each vertical post or wall. Then cut
equal amounts from both ends of each Railing Snap so the pieces
fit with uniform hole spacing in opening. *Ensure holes align for
both pieces.
Step 3
Align (C) 1" Sq. Balusters holes to predrilled holes on the smooth
side of (B) Railing Snap. Fasten each baluster
with two 1.5" SMS fasteners. Continue fastening
all necessary balusters.
Step 4
Repeat Step 3 at the other end of the (C) “1" Sq.
Balusters” to create your railing section
Step 5
Snap railing section into secured
(A) 2x2" Bottom Rail.
Step 6
Snap (A) 2x2" Top Rail onto railing
assembly. IMPORTANT: make sure that
the spline grooves face the same
direction (diagram A).
Step 7
Secure top rail to existing posts
or walls with (D) Capri Clips and
(F) ¾" Self Drilling Fasteners.
IMPORTANT
Make sure the
spline groove is
facing the desired
direction.
1
www.maddenmetals.com
For assistance call
Madden Manufacturing
1-800-248-1520
2
3
4
6
5
7