
Installation Guide


METHOD 1 for Installation – WHEN EXPANDING TUBES AT LEAST 4”
(40 - 73” Tubes - expanding 40” to MORE than 44”, 28 - 48” – expanding 28” to MORE than 32”,
64 – 118” Tubes– expanding 64” to MORE than 68”, 17.5 - 27” - expanding to MORE than 21.5”)
1. MEASURE & MARK SIDE WALL FROM FLOOR UP
Shelf Heights: Measure longest shirt or another item from floor to top of Hanging Rod.
Single Hanging: 60” - 80” from floor to **Top of Hanging Rod** (NOT top of shelf).
Double Hanging: 80” - 84” from floor to **Top Hanging Rod** & 40” - 42” for Bottom Shelf.
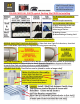
2. TAPE TUBE RECEIVER TEMPLATE to SIDEWALL– MUST be LEVEL.
3. MARK FOUR SCREW HOLES & POKE through “X” on template - use Pen/Nail/Screw
Tube Receiver: Large Holes on Top - Small TAB on back MUST Touch Back Wall
4. REMOVE TUBE RECEIVER TEMPLATE from Side Wall
5. MAKE SURE THAT HOLES ARE LEVEL Hold Tube Receiver to Screw Holes & Check Level
6. CHECK for STUDS - Push Screw/Nail in drywall
Must go All the way in or you may have Hit Stud/Pipe
Note: EZ Shelf will hold 200 lbs. of evenly distributed weight Without securing to studs.
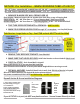
7. DRYWALL ANCHORS -Poke/Drill Small hole in wall, Push TIP Only of Anchor in Drywall
& Screw in Plastic Anchors (see Drywall & Anchor pictures below).
Use power screwdriver/electric drill (on LOW setting – do NOT over tighten).
Drywall Anchor & Screw Installation Diagrams
If you HIT STUD in drywall, do NOT use plastic anchors - Secure Screws Directly to Stud
TAB
MUST
TOUCH
BACK
WALL
1. Press Tip of anchor into
Drywall using screw gun
or screwdriver.
Screw anchor Clockwise
(USE LOW SETTING) into
drywall until anchor stops
flush with wall.
2.
Place item
over
anchor &
insert
screw.
3.
Tighten
screw
until
flush
with
item.
Large Holes
on Top
Anchor-Screw
Holes
**Top of
Hanging Rod**
Left Tube Receiver: SMALL diameter
Right Tube Receiver : LARGE diameter