
Installation Guide


or email EZ@EzShelf.com
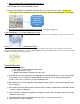
Included Plastic Parts
Tube Receivers – 5 Left & 5 Right
5 Center Supports
4 End Brackets – optional use
left shown
For EZ Installation, Read Instructions & WATCH installation videos BEFORE beginning installation.
Installation videos: www.ezshelf.com/videos
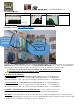
This Photo shows EZS-SCRW72-5-4 includes 5 Closet Shelf & Rod units (each expands from 40”-73” in length) & 4
End Brackets. The above picture also shows one additional EZS-SCRW72-SR (or you can use 1 of the Shelf & Rod
units in the Kit). Other layouts are possible depending upon closet measurements & your requirements.
1) Measure each wall of closet before beginning and design your closet space(s).
2) Read Instructions & Watch 2 Minute Videos
The above picture has the following configuration:
Left Wall – Double Hanging
- Top Shelf & Rod - 2 Shelf and Rod Units Joined Together with 1 included End Bracket
Maximum Length 147” (73” + 73” expanded length of Shelf & Rod Unit + 1” for End Bracket)
Minimum Length is 81” (40’ + 40” compressed length of Shelf & Rod Unit + 1” for End Bracket)
- Bottom Shelf & Rod – 2 Shelf & Rod Units Joined Together with 1 included End Bracket
Maximum Length 147” (73”+ 73” expanded length of Shelf & Rod Unit + 1” for End Bracket)
Minimum Length is 81” (40’ + 40” compressed length of Shelf & Rod Unit + 1” for End Bracket)
Back Wall - Single Hanging for Long Hanging Items (robes, long dresses, gowns, etc).
The Shelf & Rod Unit (40’ – 73”) is mounted to back wall utilizing 2 included End Brackets.
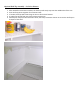
Shoe Rack – After inserting tubes into left and right Tube Receivers Expand Shelf & Rod Unit to desired length and
place on floor with Hanging Rod resting on floor closest to Back Wall. This is the 6
th
Shelf & Rod unit so either you have
to purchase 1 more or eliminate 1 of the units on the left or back wall.
2 Shelf & Rod Units
Joined Together
with included
End Brackets
Shelf & Rod Unit
Mounted on Back
Wall
with 2 End Brackets