
Installation Guide


16
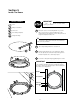
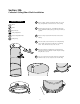
Ladder
Pencil/Marker
Safety Equipment
Shim
Bottom Adjustable Tube
TOOLS & PARTS
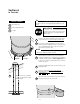
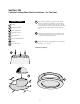
Place bottom adjustable tube (with the flanged end
down) through the rough-cut hole in the ceiling.
1
Guide the top portion of the tube up through the
roof flashing so it protrudes upward through the
flashing collar on the roof.
2
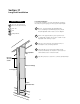
Place a temporary shim or ruler across the ceiling opening.
(Approx 1/8” thick)
3
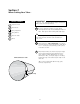
Center the tube over the ceiling cut-out, resting the
tube down onto the shim. (The shim will keep the
tube from falling through the ceiling.)
4
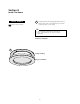
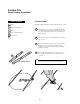
Start with regular installation instructions beginning in Section 1.
On the roof, mark the protruding tube at the top of the
flashing collar with a felt pen. This will indicate where
the extra length of tubing must be trimmed off for a
short shaft install.
5
3
5
1
2
4
The solar powered dimmer will not work with a cathedral
ceiling or some short installations due to space restrictions.
NOTE
Section-10a
Cathedral Ceiling/Short Shaft Installation