
Instruction Manual

1
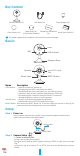
Box Content
Internet Camera (x1) USB Cable (x1) Power Adapter (x1)
Foam Sticker (x2)
Metal Plate (x1)
(3.5mm Hole Diameter)
Regulatory Information
(x1)
Quick Start Guide (x1)
The camera appearance is subject to the actual one you have bought.
Basics
MIC
Lens
LED Indicator
Magnetic Base
Speaker
Power Input
microSD Card
Slot
RESET Button
Name Description
LED Indicator • Solid Red: Camera is starting up.
• Slow-ashingRed:Wi-Ficonnectionhasfailed.
• Fast-ashing Red: Device exception (e.g. microSD card error).
• Solid Blue: Video is being viewed or played back in EZVIZ App.
• Fast-ashing Blue:CameraisreadyfortheWi-Ficonnection.
• Slow-ashing Blue: Camera is running properly.
microSD Card • microSD Card should be purchased separately.
• Initialize the card in the EZVIZ app before using it.
RESET Button Hold down the RESET button for 5 seconds while the camera is running, the
camera restarts and all parameters are reset to default.
Setup
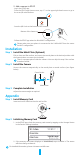
Step 1
Power-on
Plug the power cable into the camera and to the power adapter and then into a
poweroutlet,asshowninthegurebelow.
Power Outlet
Power Cable
Step 2 Camera Setup
1. Create a user account
-
ConnectyourmobilephonetoWi-Fi.
-
Download and install the EZVIZ app by searching “EZVIZ” in App Store or Google
Play
TM
.
-
Launch the app and register for an EZVIZ user account following the start-up
wizard.